45°25′26″N 11°11′26″E / 45.42389°N 11.19056°E
| Battle of Caldiero | |||||||
|---|---|---|---|---|---|---|---|
| Part of the War of the Third Coalition | |||||||
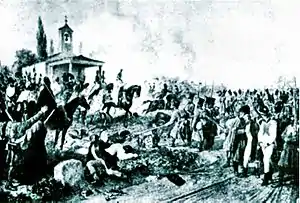 Archduke Charles and staff at the Battle of Caldiero | |||||||
| |||||||
| Belligerents | |||||||
|
|
| ||||||
| Commanders and leaders | |||||||
|
|
| ||||||
| Strength | |||||||
|
33,000–49,000[1] 23,600–33,000 engaged[1] | 49,200[1] | ||||||
| Casualties and losses | |||||||
|
3,729 total:[2] 3,204 killed or wounded[2] 525 captured[2] |
9,221 total:[2] 503 killed[2] 2,209 wounded[2] 1,509 captured[2] a further 5,000 captured at Cara Albertini[3] | ||||||
The Battle of Caldiero took place on 30 October 1805, pitting the French Armée d'Italie under Marshal André Masséna against an Austrian army under the command of Archduke Charles, Duke of Teschen. The French engaged only some of their forces, around 33,000 men, but Archduke Charles engaged the bulk of his army, 49,000 men, leaving out Paul Davidovich's corps to defend the lower Adige and Franz Seraph of Orsini-Rosenberg's corps to cover the Austrian right against any flanking maneuvers. The fighting took place at Caldiero, 15 kilometres east of Verona,[1] during the War of the Third Coalition, part of the Napoleonic Wars.
Preliminaries
By mid October, Marshal André Masséna, a seasoned French general, who had fought the Austrians in Lombardia before during the campaign of 1796–1797, was waiting for developments on the main theatre of operations in Bavaria.[4] On 18 October, Masséna won a bridgehead on the east bank of the Adige River in the Battle of Verona. At dawn, the French launched their attack from Verona against Josef Philipp Vukassovich's division. After heavy fighting, the divisions of Guillaume Philibert Duhesme and Gaspard Amédée Gardanne cleared the town of San Giorgio and part of the heights of Veronetta. The French lost 77 dead and 246 wounded, while the Austrians suffered 246 killed and 906 wounded. Archduke Charles was so unhappy with Vukassovich's performance that he replaced him with Franz Seraph of Orsini-Rosenberg.[5]
News that Emperor Napoleon I demolished the main Austrian army in the Ulm Campaign finally reached Masséna on 28 October and he issued orders for an immediate offensive against the Austrian army in northern Italy. Crossing the Adige river with the divisions of Duhesme, Gardanne, and Gabriel Jean Joseph Molitor and leaving behind Jean Mathieu Seras' division to cover Verona, Masséna planned to move forward into Austrian-controlled territory.[4]
The fighting on 29 October is considered by one historian to be part of the Battle of Caldiero.[6] On that day, the divisions of Duhesme and Gardanne advanced on the left against Rosenberg, while Molitor's and Louis Partouneaux's divisions moved forward against the town of Veronetta. Seeing a mass of French troops approaching, the Austrians abandoned Veronetta and fell back to San Michele. The French mauled Rosenberg's division and forced Johann Maria Philipp Frimont out of San Michele after street fighting. By the end of the day, Masséna's troops closed up to the main defense line of Archduke Charles. The French counted losses of 527 killed and wounded, plus 157 captured. Again, Austrian casualties were heavier, numbering 1,926 killed and wounded, with 1,114 prisoners.[7]
Archduke Charles of Austria-Teschen, himself acutely aware of the dire consequences of the fall of Ulm, was planning to move towards Vienna, in order to reinforce the remains of the Austrian army and link up with the Russians. However, in order to avoid having Masséna's men on his heels, he decided to suddenly turn and face the French, hoping that by defeating them he would ensure the success of his march towards inner Austria.[8]
Battle plans
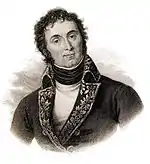
Archduke Charles had already made preparations for a French attack, occupying the strategic village of Caldiero, through which passed the main Lombardian road ('the Verona road') and deploying no less than 58 cannons and 24 mortars. The Austrian forces were divided into three main groups: to the right, Joseph Anton von Simbschen occupied the heights of Colognola and the ravine of San Zeno, where his cavalry was massed; in the centre, General Count Heinrich von Bellegarde covered the Verona road, holding the entrenchments north of the road as well as Monte Rocca and Ponterotta, to the south of the road; the left was formed by Prince Heinrich XV of Reuss-Plauen's forces, which extended the Austrian line to Chiavighette and had the detached division of General Joseph Armand von Nordmann cover the Adige in front of Chiavica del Christo.[4]
Upon reconnoitering the Austrian position, Masséna drew up his plan. General Gardanne was to form the apex of the army, deploying his forces on both sides of the Verona road, supported by Partouneaux's reserve, Jean Louis Brigitte Espagne's cavalry and a part of Julien Augustin Joseph Mermet's dragoons. To the left Molitor's division would deploy close to Ca dell'Ara and would set out to take the heights of Colognola. To the right, Duhesme would march on Gombione in order to fall upon Caldiero, but he was ordered to make his move towards midday. Finally Jean-Antoine Verdier would cross the Adige at Perzacco and turn the enemy left, with the support of Charles Joseph de Pully's cavalry while the rest of Mermet's cavalry would ensure contact with Verdier.[4]
Battle

Masséna was planning to wait for Verdier's flanking maneuver before committing to a frontal attack, but Archduke Charles took the initiative, attacking on both flanks of the French army. Taking with him the cavalry he had available, Simbschen made the first move against Molitor, descending the slope of the Colognola heights and approaching Ca dell'Ara. On the other side of the battlefield, Nordmann moved forward too, following the river line of the Adige. Molitor moved forward himself and his forces clashed with Simbschen's, forcing the latter back up the slopes of the Colognola Alta. Just as the French were coming up the slope in order to assault that position, the Austrians were reinforced by troops sent by Bellegarde and thus could repulse the French attack, pushing them into the ravine. A second French assault would also fail and the fighting would continue throughout much of the day, with the Austrians remaining masters of the heights.[4]
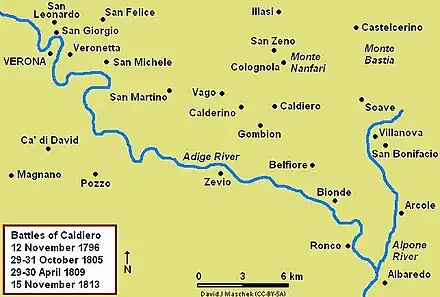
In the centre, general Gardanne belatedly formed his men and painstakingly fought his way up towards Caldiero against a determined Bellegarde. Gardanne's first attempt failed and he was forced to fall back on Rotta, where he was immediately reinforced by Partounneaux and d'Espagne. With his force thus augmented, Gardanne moved forward again and this time the French managed to take the vital position of Caldiero. A furious Austrian counterattack regained the position only to see Gardanne receive further reinforcements, one of Duhesme's brigades, which helped retake Caldiero. Bellegarde reformed his men for another counterattack, which he led in cooperation with Reuss-Plauen's forces, which had just come up as reinforcements. It took a considerable effort from the combined forces of Bellegarde and Reuss-Plauen to drive the French out of Caldiero, but Gardanne sounded the charge and regained control of the village after fierce hand-to-hand combat. The Austrians finally evacuated the position and the exhausted French drove them out and then fell back to the relative safety of the village.[4]
On the French right, general Duhesme moved early against the forces of prince Reuss-Plauen and moved his first brigade under François Goullus against the Austrians at Gombione. However, Duhesme saw the situation on his left rapidly deteriorating and was thus forced to send Mathieu Herbin's brigade in support of Gardanne's assault of Caldiero. While Herbin's brigade would be in the thick of the fighting until nightfall, Goullus' would spend the day covering the position at Gombione.[9]
To the extreme right, Verdier was operating the flanking maneuver as ordered, when he learned that Davidovich had crossed the Adige at Bonavigo and was on the right bank with a part of his troops. Verdier promptly abandoned his initial plan of crossing at Perzacco and instead decided to cross the river right away at Zevio. However, instead of striking at the back of Nordmann's force, as he had hoped Verdier found himself facing the bulk of Nordmann's troops, which soon forced the French back across the river.[2]
As night fell, combat ceased, with the Austrians already disengaged in most sectors of the battlefield. Archduke Charles decided against renewing battle the next day and began pulling out during the night.[2]
Casualties
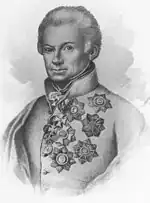
Both sides took heavy casualties, with the French losing only slightly fewer men than the Austrians, around 3,700 to 4,200. The French also lost colonel Julliac de Manelle of the 2nd Foot Artillery Regiment, who was mortally wounded during the battle. Some vicious fighting involved the French 5th Line Infantry Regiment, which almost lost two of its eagles.[2] A second source gives Austrian losses as 5,700 and notes that Charles claimed to have inflicted 8,000 casualties on the French.[10] A third source puts Austrian losses higher than 5,500 and says that the French under-reported their casualties as 2,000 when they must have been at least 5,000.[11]
On 30 October, as a result of the defeat at Caldiero, the Austrians also lost a further 5,000 men and 70 officers (among which there were three superior officers) with their weapons and effects. These men were stationed at Cara Albertini under the command of General Hillinger and were forced to surrender. Although the French had agreed to release the prisoners, the 5,000 men would not be released.[3] Two authorities put Hillinger's disaster on 2 November and gave Austrian losses as 400 killed and wounded and 1,800 captured.[12][13] Another source gives no casualties or date for the action but wrote that Hillinger was "annihilated".[14]
Strategic aftermath
Archduke Charles began his retreat on the morning of 1 November, leaving a rearguard under Frimont to delay the French. Frimont's mixed brigade, consisting of four battalions and 12 squadrons, was only lightly engaged in the battle. Reinforced by infantry and an additional cavalry regiment, the rear guard put up a lively fight when pressed by d'Espagne's cavalry and the 22nd Light Infantry Regiment.[14]
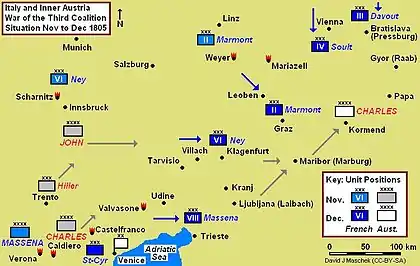
Bellegarde, Rosenberg, and Reuss fell back to Vicenza while Davidovich's corps withdrew to Padua. Hoping to create trouble in Massena's rear, Charles ordered Davidiovich to reinforce the Venice garrison with 12 battalions. Unknown to Charles, Laurent de Gouvion Saint-Cyr's 8,700-man Italian division was marching northeast from central Italy. When it arrived near Venice, Saint-Cyr had sufficient strength to blockade the port and prevent the Austrian garrison from harassing Massena's communications.[15]
Archduke Charles steadily retreated, fighting a rear guard action at San Pietro in Gu near the Brenta River on 4 November in which one battalion of the Kreutzer Grenz Infantry Regiment Nr. 5 was destroyed by Molitor's division.[16] Another clash occurred at Valvasone, east of the Tagliamento River on 11 November, where Charles fended off the French pursuit.[17] During the withdrawal, d'Espagne trailed the Austrians with his own light cavalry division, Antoine Digonet's brigade of Verdier's division, Seras' infantry division, and Pully's cuirassiers. D'Espagne managed the pursuit effectively, making Charles believe that he was being closely followed. In fact, Masséna's main body was a three-day march behind the Austrians. Charles crossed the Isonzo River on 13 November.[15] Karl von Vincent held off Molitor's attempt to cross the Isonzo River at Gradisca d'Isonzo on 16 November.[18]
At the beginning of the war, Archduke John of Austria was assigned to command the army in the Tyrol and the Vorarlberg. He was directed to detach forces under Franz Jellacic and Franz Xaver von Auffenberg to the Danube army. Auffenberg's division was mauled at the Battle of Wertingen and later surrendered at the Battle of Ulm. Jellacic was required to guard the south flank of the Danube army near Lake Constance. Marshal Pierre Augereau's VII Corps ran him to earth in the Vorarlberg. Jellacic surrendered with his infantry on 14 November in the Capitulation of Dornbirn, his cavalry having gotten away. Another brigade of the Tyrol army under Prince Louis Victor Rohan-Guéméné became separated in the retreat and slipped away to the south where it made a dash for Venice.[19] On 24 November Rohan's 4,400 troops were caught between the divisions of Jean Reynier and Saint-Cyr at the Battle of Castelfranco Veneto and forced to surrender.[20] John managed to escape to the east with about 20,000 soldiers[19] and fought a successful rear guard action against Nicolas Bernard Guiot de Lacour's dragoons near the upper Isonzo at Bovec on 19 November 1805.[20]
Charles hoped to march northeast to Villach for an early junction with his brother, Archduke John. However, he heard that some of Napoleon's troops were moving in his direction from the Danube valley.[21] Marshal Michel Ney's VI Corps was repulsed at Scharnitz on 4 November with 800 casualties. However, that day, another brigade broke through a pass farther west at Leutasch, capturing about 600 Austrian line infantry.[22] At Weyer on 7 November, Auguste Marmont's II Corps overtook and captured two battalions belonging to Maximilian, Count of Merveldt's corps. Farther east on the following day, Louis Davout's III Corps advance guard crushed Merveldt's column at the Battle of Mariazell.[23] Ney occupied Innsbruck on 7 November and Marmont was heading for Leoben in Styria. Armed with this new information, Charles instead directed his troops' march on a more easterly path toward Ljubljana (Laibach). Massena suspended his pursuit of Charles on 16 November.[21]
Archdukes Charles and John joined forces near Maribor (Marburg an der Drau) on 26 November. Though he now had an army numbering 85,000, Charles elected not to make a thrust at Vienna by attacking Marmont. Instead, he "moved rather slowly" according to historian Gunther E. Rothenberg. Charles pitched camp on the Mur River until 2 December when he withdrew into Hungary. By the time he reached Körmend on 6 December, the Battle of Austerlitz had been fought, ending in a decisive French victory.[19]
Even after his great victory, Emperor Napoleon considered Archduke Charles' large army a threat. Accordingly, he directed Massena to reorganize his army as the VIII Corps, sweep east, and send Mermet's and Pully's heavy cavalry to Graz. Marmont massed at Graz with the II Corps while Ney reached Klagenfurt with his VI Corps. Napoleon stationed Marshal Davout's III Corps at Bratislava (Pressburg) and Marshal Nicolas Soult's IV Corps south of Vienna. Charles' army was completely boxed in. On 26 December, the Treaty of Pressburg was signed, ending the conflict.[24]
Commentary
The battle was a significant strategic victory for the French as it allowed them to closely follow and continually harass the Austrian army as it fell back towards inner Austria. Masséna thus delayed Charles, preventing him from joining the army of the Danube and directly influencing the main theatre of the war.[8]
Historians disagree on whether Caldiero was a French tactical victory, an Austrian tactical victory or a draw. Alain Pigeard, whose work is a major source for this article, rated the engagement as a French victory.[1] Digby Smith called the battle a "drawn match",[25] but Frederick C. Schneid called it "indecisive".[14] Gunther E. Rothenberg wrote that Caldiero was "Austria's solitary military success in this war",[12] but he was aware that the French historian Adolphe Thiers had considered the battle to be a French victory.[26]
Napoleon was more critical of Andre Masséna: ‘(He) has behaved indifferently. He made bad dispositions and got himself beaten at Caldiero’.[27]
Bibliography
- Fierro, Alfredo; Palluel-Guillard, André; Tulard, Jean – Histoire et Dictionnaire du Consulat et de l'Empire, Éditions Robert Laffont, ISBN 2-221-05858-5
- Pigeard, Alain – Dictionnaire des batailles de Napoléon, Tallandier, Bibliothèque Napoléonienne, 2004, ISBN 2-84734-073-4
- Rothenberg, Gunther E. Napoleon's Great Adversaries, The Archduke Charles and the Austrian Army, 1792–1814. Bloomington, Ind.: Indiana University Press, 1982 ISBN 0-253-33969-3
- Schneid, Frederick C. Napoleon's Italian Campaigns: 1805–1815. Westport, Conn.: Praeger Publishers, 2002. ISBN 0-275-96875-8
- Smith, Digby. The Napoleonic Wars Data Book. London: Greenhill, 1998. ISBN 1-85367-276-9
- Thiers, L. A. Histoire du Consulate et de l'Empire, vol. VI. Paris, 1845–1862.
- Hollins, David - 'That Other Battle in 1805: Second Caldiero' in: Bamford, Andrew (ed.) - Glory is Fleeting, Helion Publishing, 2021 ISBN 9781804511244
References
- 1 2 3 4 5 6 Pigeard, 170
- 1 2 3 4 5 6 7 8 9 10 Pigeard, 172
- 1 2 Pigeard, 178
- 1 2 3 4 5 6 Pigeard, 171
- ↑ Schneid, 27–28
- ↑ Smith, 209. Smith writes that the battle lasted from 29 to 31 October.
- ↑ Schneid, 30
- 1 2 Fierro, Palluel-Guillard, Tulard, 580–581
- ↑ Pigeard, 171–172
- ↑ Smith, 209–210
- ↑ Schneid, 39
- 1 2 Rothenberg, 94
- ↑ Smith, 210. Smith differed from Rothenberg only in giving 400 killed and listing no wounded, but this may be a misprint.
- 1 2 3 Schneid, 40
- 1 2 Schneid, 41
- ↑ Smith, 211–212
- ↑ Smith, 213–214
- ↑ Smith, 214
- 1 2 3 Rothenberg, 99
- 1 2 Smith, 215
- 1 2 Schneid, 41–42
- ↑ Smith, 211
- ↑ Smith, 212
- ↑ Schneid, pp 42–43
- ↑ Smith, 210
- ↑ Thiers, vol. VI
- ↑ Napoléon I, The Confidential Correspondence of Napoleon Bonaparte with his brother Joseph (New York: D. Appleton,1855) I p.70 (15 November 1805)
External links
 Media related to Battle of Caldiero (1805) at Wikimedia Commons
| Preceded by Battle of Trafalgar |
Napoleonic Wars Battle of Caldiero (1805) |
Succeeded by Battle of Cape Ortegal |