| Capture of Le Quesnoy | |||||||
|---|---|---|---|---|---|---|---|
| Part of the Western Front of the First World War Hundred Days Offensive: Battle of the Sambre (1918) | |||||||
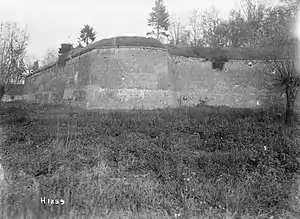
 The walls of Le Quesnoy, scaled by New Zealand troops when taking the town from German forces on 4 November 1918 | |||||||
| |||||||
| Belligerents | |||||||
|
|
| ||||||
| Commanders and leaders | |||||||
|
| Hauptmann von Calm (Le Quesnoy garrison) | ||||||
| Units involved | |||||||
| |||||||
| Casualties and losses | |||||||
|
122 killed 375 wounded |
43 killed 251 wounded 2,000 prisoners of war | ||||||
 | |||||||
The Capture of Le Quesnoy was an engagement of the First World War that took place on 4 November 1918 as part of the Battle of the Sambre. Elements of the New Zealand Division scaled the fortified walls of the French town of Le Quesnoy and captured it from elements of the defending German 22nd Division.
Beginning at 5:30 am, the New Zealand Rifle Brigade advanced from its starting positions east of the town, aiming to surround it and link up on the far side. By late morning, this had been achieved and other elements of the New Zealand Division moved further west into the Mormal Forest, leaving the Rifle Brigade to capture the town itself. After mopping up outlying outposts, the New Zealanders moved up to the ramparts of the town, but were held back by machine-gun fire. Late in the afternoon, a scouting party located an unguarded section of the walls and the brigade's 4th Battalion managed to climb the ramparts and move into the town, quickly seizing it. The capture of Le Quesnoy was the last major engagement of the war for the New Zealanders.
Prelude
By mid-1918, the German Army had been fought to a standstill after its Spring Offensive and the Allies had sought to take the initiative. Accordingly, the Hundred Days Offensive began on 8 August, with an attack on Amiens which marked the beginning of a series of advances by the Allies that ultimately ended the war.[1] By late October, the New Zealand Division, commanded by Major General Andrew Russell, along with part of the British Third Army, had advanced to the west of the town of Le Quesnoy.[2]
The Battle of the Sambre, which was planned to begin on 4 November, was the next phase of the Allied advance. The battle was to consist of a series of engagements mounted by the British First, Third and Fourth Armies across a 30-mile (48 km) front, extending from Oisy to Valenciennes, to advance to the eastern edge of the Mormal Forest. IV Corps, with the New Zealand Division and the 37th Division, was to surround Le Quesnoy[3] and its garrison of over 1,500 soldiers.[4] The 37th Division was on the southern flank of the New Zealand Division while to its north was the 62nd Division of VI Corps.[3] The New Zealand Division was to extend the front line to and around Le Quesnoy and into the Mormal Forest.[5]
Le Quesnoy
Positioned on high ground between the Ecaillon and Rhonelle Rivers, Le Quesnoy was a medieval town that had been fought over several times in previous centuries. It guarded a natural approach across plains to the north-east and had fortress walls with ramparts designed by Sébastien Le Prestre de Vauban, a 17th-century military engineer.[6] A moat surrounded the town and was in fact two distinct ditches, with 20–30-foot (6.1–9.1 m) high fortifications, effectively an outer rampart, separating them.[7] The town could be entered by three roads, guarded by gates. Prior to the First World War, Le Quesnoy had a population of 5,000. It had been in German hands since August 1914, and despite some evacuations, there were still around 1,600 civilians in the town.[6][8]
Le Quesnoy was in the sector of Army Group Crown Prince Rupprecht of Bavaria, with the area garrisoned by the German 22nd Division.[9] The division was well understrength. Its Infantry Regiment 167 held the main defensive position, along the Cambrai railway line to the west of Le Quesnoy. This was the main line of defence for the Germans. Infantry Regiment 83 provided some support to the south. The 22nd Division's artillery regiment was positioned to the east of Le Quesnoy with security provided by a battalion of Infantry Regiment 82. A second battalion from the same regiment defended a line further east. The town itself, under the command of Hauptmann (captain) von Calm, an artillery officer, was defended by a battalion of the 83rd Reserve Infantry Regiment which had two companies on the western ramparts while another company was positioned on the south walls; some light machine-guns were also in the town as were three field artillery guns and a light mortar. Commanded by Oberleutnant (first lieutenant) Fessenmayer, the battalion was significantly reduced in fighting personnel; each company only had on average 17 men, and there were only around 120 to 130 defenders in the town, excluding medical personnel and wounded soldiers being treated.[10][11]
Plan of attack
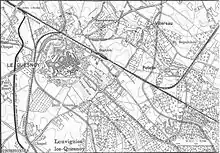
On 3 November, the New Zealand Division section of the front line was around 2,500 yards (2,300 m) in length, running southwards from a level crossing on the Valenciennes railway line. It was 400 yards (370 m) from the Cambrai railway, with the ramparts of Le Quesnoy a further 400 yards (370 m) to the east. The front line was manned by the four battalions of the New Zealand Rifle Brigade, commanded by Brigadier General Herbert Hart.[12]
The ramparts of Le Quesnoy clearly made a frontal attack undesirable and artillery could only be used sparingly on the town, due to the presence of the civilian population. Instead, it was intended that under the cover of a smokescreen, the town be enveloped from the north and south, thereby encircling it. Two New Zealand brigades were to be involved; Hart's Rifle Brigade was tasked with the capture of the town, while the 1st Infantry Brigade, under the command of Brigadier General Charles Melvill, was to push into the Mormal Forest. The division's flanks were held by the 62nd Division and the 37th Division, on the left and right respectively and these formations were to make corresponding movements forward.[13][14]

The capture of Le Quesnoy was to be achieved through a series of advances, covered by artillery, by the battalions of the Rifle Brigade with some of the battalions of 1st Infantry Brigade in support. Beginning from the brigade's existing positions, the first advance was to involve three of the Rifle Brigade's battalions moving forward to a line defining an arc to the west of Le Quesnoy, including the railway line, which was designated the "Blue Line". Then the 1st Auckland Battalion of the 1st Infantry Brigade would push north-east around the town, while the last of the Rifle Brigade's battalions, held in reserve, went to the south-east. The advance westwards would culminate in the establishment of a new front line, designated the "Green Line" to the east of Le Quesnoy, which would be manned by the battalions of 1st Brigade. Once the "Green Line" had been formed, the Rifle Brigade was to move into the town, while two battalions of 1st Brigade were to advance further to the west up to the "Red Line", defined by a road running along the western edge of the Mormal Forest.[13][15]
Artillery fire was to be limited to shrapnel fire deployed on the ramparts and smoke shells. One exception to this was the targeting of the tower of a prominent building in the town to prevent its use as an observation post. At the commencement of the attack, burning oil was to be fired onto the western walls of the town to obscure the vision of the defenders. The Royal Air Force's No. 59 Squadron was to fly aircraft with observers for directing the artillery onto any potential counterattacks or targets of opportunity.[16]
Battle
The covering artillery barrage commenced at 5:30 am and the 1st, 2nd and 4th Rifle Battalions moved off towards the "Blue Line", the railway line which established a continuous front west of Le Quesnoy. A mist also helped cover the advancing New Zealanders from defensive fire. The 4th Rifle Battalion, in the centre of the advance, came up against the defences along the western side of Le Quesnoy. They confirmed the presence of the German garrison in the town; it had been hoped they would have evacuated. The 1st Rifle Battalion was moving forward to the south of the town, and on its flank, the 37th Division moved forward as well. The 2nd Rifle Battalion was the northern part of the advance; several men were killed by a well sited machine gun post before it could be overcome. The "Blue Line" was reached by 7:15 am. A reserve company moved to the railway line to hold it, while the attacking battalions moved forward. A platoon of the reserve company had to deal with 150 Germans, who were retreating from the advance of the flanking 37th Division. Despite the advantage of numbers, the Germans quickly surrendered.[17][18] At this stage of the war, the motivation of the German forces to fight on had significantly reduced compared to earlier in the conflict.[19]
With the "Blue Line" secured, the 1st Auckland Battalion took over the advance in the northern part of the line, bordering the neighbouring 62nd Division, while the 3rd Rifle Battalion, having previously been held in reserve, did the same from the south-east. By 10:00 am, the two battalions had reached the "Green Line", 1-mile (1.6 km) to the east of the town. The 1st Infantry Brigade took responsibility for the front line, with the 3rd Rifle Battalion turning around and moving up to the eastern side of Le Quesnoy. All four of the battalions of the Rifle Brigade now surrounded the town. Having followed the 1st Auckland Battalion, the 1st and 2nd Wellington Battalions of the 1st Infantry Brigade moved off to the Mormal Forest at 10:30 am. The advance to the "Red Line", secured by midday, was relatively easy, with the Germans for the most part being more interested in withdrawing than defending their positions. Some of the Wellington men even moved into the forest itself, taking prisoners and capturing artillery pieces.[18][20]
This left the Rifle Brigade to complete its planned move into Le Quesnoy, the German garrison having been reinforced with around 600 soldiers of Infantry Regiment 167 who had evaded capture by the New Zealanders and retreated into the town.[19][21] By this time, the garrison realised the town was surrounded.[22]The 1st Rifle Battalion, to the south of the town, had the most exposed ground to its front and was unable to move close to the ramparts.[18] The 2nd Rifle Battalion probed from the north, while the 3rd Rifle Battalion was advancing to the Landrecies road which led to one of the entry points into Le Quesnoy. German troops held a bridge on the road in force and were able to keep the New Zealanders at bay in this area. A prisoner of war was sent forward at 10:00 am with an invitation to surrender, which was refused as was another attempt at 3:00 pm.[23][24]
In the north, a small party of the 2nd Rifle Battalion reached the outer rampart dividing the moat along their stretch of the front. Gunfire from the main ramparts soon drove them off but Lieutenant Colonel Leonard Jardine, commanding the 2nd Rifle Battalion, co-ordinated the movements of his companies, which gradually moved forward. At around 1:00 pm Jardine sent a prisoner of war into the town inviting the garrison to surrender, but without success. By 4:00 pm mortar fire was able to be brought to bear on the main ramparts and this silenced the German machine-guns and allowed entry to the town for the 2nd Rifle Battalion.[24][25]

In the meantime, the 4th Rifle Battalion, commanded by Lieutenant Colonel Harold Barrowclough and positioned on the "Blue Line" a distance from the west wall of the ramparts, had carried out scouting expeditions to explore the defences. Gradually, the German posts around the fortifications fell to the attacking platoons of the battalion. As on the northern side of the town, machine-gun fire from the ramparts prevented any further advance. One party reached the outer rampart but became pinned down by gunfire for several hours. By midday, the situation had settled into a temporary stalemate.[24][26]
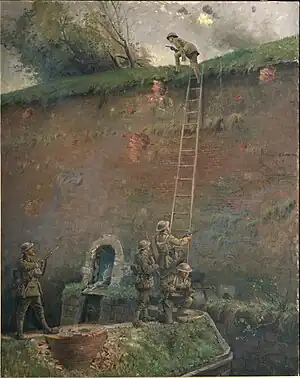
Second Lieutenant Leslie Averill, the intelligence officer for 4th Rifle Battalion, continued to investigate the defences. He was able to locate a route to a section of the ramparts that appeared unmanned and was not under fire from the defenders. He was ordered by Barrowclough to force an approach. With the benefit of covering mortar fire, Averill and a platoon of the battalion reserve company managed to cross the moat and found themselves at the inner ramparts. With the aid of a 30-foot (9.1 m) ladder supplied by the Divisional Engineers, Averill was able to ascend to the top of the ramparts, closely followed by the platoon commander. With his revolver, Averill fired at two Germans manning a guard post, forcing them to cover, and the rest of the platoon joined him. With an entrance through the defenses secured, Barrowclough and the rest of the battalion used the ladder and entered the town shortly afterwards. At the same time, a party from 2nd Rifle Battalion, seized the gate guarding the road into Le Quesnoy from Valenciennes and began entering the town from the north.[24][26] A counterattack was ordered but never eventuated due to the speed at which the New Zealanders spread through the town.[22] The Germans quickly surrendered.[24][26]
Aftermath

In Germany, dispatches reported that Le Quesnoy had been evacuated but this was clearly incorrect.[27] Over 2,000 Germans were taken prisoner by the division, of whom 711 surrendered in Le Quesnoy.[24][28] A postwar history of the 167th Infantry Regiment complained of looting carried out by the New Zealanders, with prisoners of war being stripped of watches and wedding rings.[22] German casualties in the town were 43 killed and 251 men wounded and many more German troops were killed during the advance of the Rifle Brigade to the ramparts. Four 8-inch howitzers, forty-two 4.2-inch guns and 26 field guns were captured by the 1st New Zealand Brigade.[4]
The New Zealand Division operation on 4 November was its most successful day on the Western Front.[29] Of the 122 New Zealanders who died during the capture of Le Quesnoy, the Rifle Brigade sustained the most losses, with 43 men killed and 251 wounded.[30] Other units of the New Zealand Division involved in the battle lost 79 men killed and about 125 wounded.[31]
An advance into the Mormal Forest was continued the next day by the 2nd Infantry Brigade but the capture of Le Quesnoy was the last major engagement of the war for the New Zealand Division. The New Zealanders began withdrawing to the rear area at midnight on 5 November.[32] A few days after the capture of the town, the mayor of Le Quesnoy presented the Rifle Brigade's commander, Herbert Hart, with the French flag that was raised over the town on the day it was captured from the Germans.[33]
Legacy
Le Quesnoy retains links to New Zealand, with some streets named for prominent New Zealanders, including Averill. Since 1999, it has been twinned with Cambridge.[34] St. Andrew's Church, in Cambridge, has a memorial window depicting New Zealand soldiers scaling Le Quesnoy's ramparts.[35] At Le Quesnoy, a monument commemorating the town's liberation by the New Zealand Division is set into the rampart wall, near where Averill scaled them.[34]
The big or Bourdon bell of the carillon at Le Quesnoy is dedicated to New Zealanders. After the abandonment the Germans set fire to the belfry and the big bell was melted. The bronze was recovered and used to make a new bell to continue the tradition. A bell in the Wellington National war memorial carillon is named Le Quesnoy and is dedicated to the New Zealand Rifle Brigade.[36]
Notes
- ↑ Wright 2005, pp. 143–144.
- ↑ Wright 2010, p. 283.
- 1 2 Pugsley 2018, pp. 26–27.
- 1 2 Edmonds & Maxwell-Hyslop 1947, p. 483.
- ↑ Pugsley 2018, p. 28.
- 1 2 Stewart 1921, pp. 564–565.
- ↑ Stewart 1921, p. 584.
- ↑ Pugsley 2018, pp. 28–29.
- ↑ Strohn 2013, pp. 328–329.
- ↑ Strohn 2013, pp. 328–331.
- ↑ Pugsley 2018, pp. 48–49.
- ↑ Gray 2010, p. 363.
- 1 2 Stewart 1921, pp. 570–571.
- ↑ Pugsley 2018, p. 42.
- ↑ Pugsley 2018, p. 30.
- ↑ Pugsley 2018, pp. 42–43.
- ↑ Stewart 1921, pp. 573–575.
- 1 2 3 McGibbon 2016, pp. 346–349.
- 1 2 Strohn 2013, p. 325.
- ↑ Pugsley 2018, pp. 66–68.
- ↑ Pugsley 2018, p. 59.
- 1 2 3 Strohn 2013, p. 331.
- ↑ Pugsley 2018, pp. 78–81.
- 1 2 3 4 5 6 McGibbon 2016, p. 350.
- ↑ Pugsley 2018, pp. 77–78.
- 1 2 3 Pugsley 2018, pp. 84–87.
- ↑ Strohn 2013, p. 327.
- ↑ Wright 2010, p. 285.
- ↑ McGibbon 2000, p. 609.
- ↑ McGibbon 2016, p. 351.
- ↑ Gray 2010, pp. 367–368.
- ↑ McGibbon 2016, p. 352.
- ↑ Crawford 2008, p. 267.
- 1 2 McGibbon 2001, p. 70.
- ↑ "Le Quesnoy memorial window, Cambridge". New Zealand History. Ministry for Culture and Heritag. Retrieved 25 October 2021.
- ↑ "France Honours New Zealand". Evening Post. 25 August 1928. Retrieved 25 October 2021.
References
- Crawford, John, ed. (2008). The Devil's Own War: The First World War Diary of Brigadier-General Herbert Hart. Auckland, New Zealand: Exisle Publishing. ISBN 978-1-877437-30-4.
- Edmonds, J. E.; Maxwell-Hyslop, R. (1947). Military Operations France and Belgium 1918: 26th September – 11th November, The Advance to Victory. History of the Great War Based on Official Documents by Direction of the Historical Section of the Committee of Imperial Defence. Vol. V (IWM & Battery Press 1993 ed.). London: HMSO. ISBN 0-89839-192-X.
- Gray, John H. (2010). From the Uttermost Ends of the Earth: The New Zealand Division on the Western Front 1916–1918. Christchurch, New Zealand: Wilson Scott Publishing. ISBN 978-1-877427-30-5.
- McGibbon, Ian, ed. (2000). The Oxford Companion to New Zealand Military History. Auckland, New Zealand: Oxford University Press. ISBN 0-19-558376-0.
- McGibbon, Ian (2001). New Zealand Battlefields and Memorials of the Western Front. Auckland, New Zealand: Oxford University Press. ISBN 0-19-558444-9.
- McGibbon, Ian (2016). New Zealand's Western Front Campaign. Auckland, New Zealand: David Bateman. ISBN 978-1-86953-926-9.
- Pugsley, Christopher (2018). Le Quesnoy 1918: New Zealand's Last Battle. Auckland, New Zealand: Oratia Books. ISBN 978-0-947506-49-0.
- Stewart, H. (1921). The New Zealand Division 1916–1919. Official History of New Zealand's Effort in the Great War. Auckland, New Zealand: Whitcombe & Tombs. OCLC 2276057. Retrieved 1 September 2014.
- Strohn, Matthias (2013). "Defending Le Quesnoy". In Philippe, Nathalie (ed.). The Great Adventure Ends: New Zealand and France on the Western Front. Christchurch, New Zealand: John Douglas Publishing. ISBN 978-0-9876665-8-1.
- Wright, Matthew (2005). Western Front: The New Zealand Division in the First World War 1916–18. Auckland, New Zealand: Reed Books. ISBN 0-7900-0990-0.
- Wright, Matthew (2010). Shattered Glory: The New Zealand Experience at Gallipoli and the Western Front. Auckland, New Zealand: Penguin Books. ISBN 978-0-14-302056-1.