 SMS Gneisenau | |
| History | |
|---|---|
| Name | Gneisenau |
| Namesake | SMS Gneisenau |
| Ordered | 8 June 1904 |
| Builder | AG Weser, Bremen |
| Laid down | 28 December 1904 |
| Launched | 14 June 1906 |
| Commissioned | 6 March 1908 |
| Fate | Sunk, Battle of the Falkland Islands, 8 December 1914 |
| General characteristics | |
| Class and type | Scharnhorst-class armored cruiser |
| Displacement | |
| Length | 144.6 m (474 ft 5 in) |
| Beam | 21.6 m (70 ft 10 in) |
| Draft | 8.37 m (27 ft 6 in) |
| Installed power |
|
| Propulsion |
|
| Speed | 22.5 knots (42 km/h) |
| Range | 4,800 nmi (8,900 km; 5,500 mi) at 14 kn (26 km/h; 16 mph) |
| Crew |
|
| Armament |
|
| Armor | |
SMS Gneisenau[lower-alpha 1] was an armored cruiser of the German Kaiserliche Marine (Imperial Navy), part of the two-ship Scharnhorst class. Named for the earlier screw corvette of the same name, the ship was laid down in June 1904 at the AG Weser shipyard in Bremen, launched in June 1906, and commissioned in March 1908. She was armed with a main battery of eight 21 cm (8.3 in) guns, a significant increase in firepower over earlier German armored cruisers, and she had a top speed of 22.5 knots (42 km/h; 26 mph). Gneisenau initially served with the German fleet in I Scouting Group, though her service there was limited owing to the British development of the battlecruiser by 1909, which the less powerful armored cruisers could not effectively combat.
Accordingly, Gneisenau was assigned to the German East Asia Squadron, where she joined her sister ship Scharnhorst. The two cruisers formed the core of the squadron, which included several light cruisers. Over the next four years, Gneisenau patrolled Germany's colonial possessions in Asia and the Pacific Ocean. She also toured foreign ports to show the flag and monitored events in China during the Xinhai Revolution in 1911. Following the outbreak of World War I in July 1914, the East Asia Squadron, under the command of Vice Admiral Maximilian von Spee, crossed the Pacific to the western coast of South America, stopping for Gneisenau and Scharnhorst to attack French Polynesia in the Bombardment of Papeete in September.
After arriving off the coast of Chile, the East Asia Squadron encountered and defeated a British squadron at the Battle of Coronel; during the action, Gneisenau disabled the British armored cruiser HMS Monmouth, which was then sunk by the German light cruiser Nürnberg. The defeat prompted the British Admiralty to detach two battlecruisers to hunt down and destroy Spee's squadron, which they accomplished at the Battle of the Falkland Islands on 8 December 1914. Gneisenau was sunk with heavy loss of life, though 187 of her crew were rescued by the British.
Design
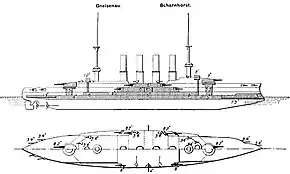
The two Scharnhorst-class cruisers were ordered as part of the naval construction program laid out in the Second Naval Law of 1900, which called for a force of fourteen armored cruisers. The ships marked a significant increase in combat power over their predecessors, the Roon class, being more heavily armed and armored. These improvements were made to allow for Scharnhorst and Gneisenau to fight in the line of battle should the need arise, a capability requested by the General Department.[1]
Gneisenau was 144.6 meters (474 ft 5 in) long overall, and had a beam of 21.6 m (70 ft 10 in) and a draft of 8.37 m (27 ft 6 in). The ship displaced 11,616 metric tons (11,433 long tons) normally, and 12,985 t (12,780 long tons) at full load. Gneisenau's crew consisted of 38 officers and 726 enlisted men. The ship was powered by three triple-expansion steam engines, each driving a screw propeller, with steam provided by eighteen coal-fired water-tube boilers. The boilers were ducted into four funnels located amidships. Her propulsion system was rated to produce 26,000 metric horsepower (19,000 kW) for a top speed of 22.5 knots (42 km/h; 26 mph). She had a cruising radius of 4,800 nautical miles (8,900 km; 5,500 mi) at a speed of 14 knots (26 km/h; 16 mph).[2]
Gneisenau's primary armament consisted of eight 21 cm (8.3 in) SK L/40 guns,[lower-alpha 2] four in twin gun turrets, one fore and one aft of the main superstructure on the centerline, and the remaining four mounted in single casemates in the hull at main deck level, abreast the funnels. The secondary armament included six 15 cm (5.9 in) SK L/40 guns, also in individual casemates that were placed a deck below the main battery casemates. Defense against torpedo boats was provided by a battery of eighteen 8.8 cm (3.5 in) SK L/35 guns mounted in casemates. She was also equipped with four 45 cm (17.7 in) submerged torpedo tubes. One was mounted in the bow, one on each broadside, and the fourth was placed in the stern.[2]
The ship was protected by a 15 cm belt of Krupp armor, decreased to 8 cm (3.1 in) forward and aft of the central citadel. She had an armored deck that was 3.5 to 6 cm (1.4 to 2.4 in) thick, with the heavier armor protecting the ship's engine and boiler rooms and ammunition magazines. The centerline gun turrets had 17 cm (6.7 in) thick sides, while the casemate main guns received 15 cm of armor protection. The casemate secondary battery was protected by a strake of armor that was 13 cm (5.1 in) thick.[2][4]
Service history
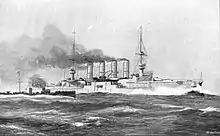
Gneisenau was the first member of the class to be ordered, on 8 June 1904; she was laid down at the AG Weser shipyard in Bremen on 28 December under yard number 144. A lengthy strike by shipyard workers delayed construction of the vessel, allowing Scharnhorst to be launched first and thus be the lead ship of the class. At Gneisenau's launching ceremony, on 14 June 1906, she was christened Gneisenau, in honor of the earlier screw corvette Gneisenau, by General Alfred von Schlieffen, the Chief of the General Staff. The ship moved to Wilhelmshaven for fitting-out and was commissioned into the fleet on 6 March 1908, before beginning sea trials on 26 March. These lasted until 12 July, when Gneisenau joined I Scouting Group, the reconnaissance squadron of the High Seas Fleet. During this period, Kapitän zur See (KzS—Captain at Sea) Franz von Hipper served as the ship's first commanding officer.[2][5]
While serving in I Scouting Group, Gneisenau participated in the normal peacetime training routine with the fleet. She took part in a major fleet cruise in the Atlantic Ocean in company with the battleship squadrons of the High Seas Fleet immediately after completing trials. Prince Heinrich had pressed for such a cruise the previous year, arguing that it would prepare the fleet for overseas operations and would break up the monotony of training in German waters. The cruise came at a time that tensions with Britain over the developing Anglo-German naval arms race were high, though no incidents occurred as a result. The fleet departed Kiel on 17 July, passed through the Kaiser Wilhelm Canal to the North Sea, and continued to the Atlantic. The fleet returned to Germany on 13 August. The autumn maneuvers followed from 27 August to 12 September, after which Hipper was replaced by KzS Konrad Trummler.[5][6]
The year 1909 followed a similar pattern, with two more Atlantic cruises, the first in February and March and the second in July and August. The latter voyage included a visit to Spain. Later in the year, Gneisenau and the light cruiser Hamburg escorted Kaiser Wilhelm II aboard his yacht, Hohenzollern, on a visit to Tsar Nicholas II of Russia off the coast of Finland. Gneisenau won the Kaiser's Schießpreis (Shooting Prize) for excellent shooting among armored cruisers for the 1908–1909 training year. The first half of the following year passed uneventfully for Gneisenau, and in July, she took part in a fleet cruise to Norway. On 8 September, the ship was reassigned to the East Asia Squadron and KzS Ludolf von Uslar took command of the ship for the deployment. By that time, the British Royal Navy had begun commissioning their new battlecruisers, which significantly outclassed armored cruisers like Gneisenau, but the German command decided that the ship could still be used to strengthen Germany's colonial cruiser squadron.[5]
East Asia Squadron
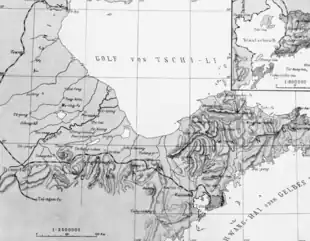
On 10 November, Gneisenau departed Wilhelmshaven, bound for Germany's Jiaozhou Bay Leased Territory in China. She stopped in Málaga, Spain, while en route, for a ceremony commemorating the men killed when her namesake corvette had been wrecked there on 16 December 1900. She then passed through the Mediterranean Sea, transited the Suez Canal, and while crossing the Indian Ocean, stopped in Colombo, Ceylon. There, she embarked Crown Prince Wilhelm on 11 December, who was on a tour of British India at the time. Gneisenau carried him to Bombay, where he left the ship. After resuming the voyage to East Asia, Gneisenau rendezvoused with the light cruiser Emden and made stops in Singapore, Hong Kong, and Amoy before arriving in Qingdao, the German squadron's home port, on 14 March 1911. There, she rendezvoused with her sister Scharnhorst, the squadron flagship. On 7 April, Gneisenau carried the new ambassador to Japan, Arthur Graf Rex, from Taku to Yokohama, where she met Scharnhorst; the squadron commander, Konteradmiral (KAdm—Rear Admiral) Günther von Krosigk, Uslar, and Scharnhorst's captain met with the Emperor Meiji. Gneisenau thereafter went on a tour of Japanese and Siberian waters, but she was sent back to Qingdao during the Agadir Crisis to prepare for a potential conflict.[7]
In September, Krosigk shifted his flag to Gneisenau while Scharnhorst was in dry dock for periodic maintenance. On 10 October, the Xinhai Revolution against the Qing dynasty broke out, which caused a great deal of tension among Europeans in the country, who recalled the attacks on foreigners during the Boxer Uprising of 1900–1901. The rest of the East Asia Squadron was placed on alert to protect German interests and additional troops were sent to protect the German consulate. But the feared attacks on Europeans did not materialize and so the East Asia Squadron was not needed. By late November, Scharnhorst was back in service and Krosigk returned to her.[8] Gneisenau won the Schießpreis again for the 1910–1911 training year.[7]
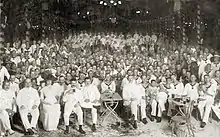
Gneisenau went into dry dock in Qingdao for annual repairs in the first quarter of 1912. On 13 April, the ships embarked on a month-long cruise to Japanese waters, returning to Qingdao on 13 May. In June, KzS Willi Brüninghaus relieved Uslar as Gneisenau's commander. Over the course of 1–4 August, Gneisenau steamed to Pusan, Korea, where she pulled the HAPAG steamship Silesia free after it ran aground and escorted it to Nagasaki. At the end of the year, Gneisenau lay at Shanghai. In early December, Krosigk was replaced by KAdm Maximilian von Spee, who took Scharnhorst and Gneisenau on a tour of the southwest Pacific, including stops in Amoy, Singapore, and Batavia. The cruise continued into early 1913, and the two cruisers arrived back in Qingdao on 2 March 1913. Gneisenau won the Schießpreis for the 1912–1913 year.[9]
In April 1913, Gneisenau and Scharnhorst went to Japan so Spee and the ships' commanders could meet with the new emperor, Taishō. The vessels then returned to Qingdao, where they remained for seven weeks. In late June, the two cruisers began a cruise through Germany's colonial possessions in the central Pacific. While in Rabaul on 21 July, Spee received word of further unrest in China, which prompted his return to the Wusong roadstead outside Shanghai by 30 July. Gneisenau thereafter patrolled in the Yellow Sea and visited Port Arthur in October. After the situation calmed, Spee was able to take his ships on a short cruise to Japan, which began on 11 November. Scharnhorst and the rest of the squadron returned to Shanghai on 29 November, before she departed for another trip to Southeast Asia. Stops included Siam, Sumatra, North Borneo, and Manila in the Philippines.[9][10]
In June 1914, KzS Julius Maerker took command of the ship.[11] Shortly thereafter, Spee embarked on a cruise to German New Guinea; Gneisenau rendezvoused with Scharnhorst in Nagasaki, Japan, where they received a full supply of coal. They then sailed south, arriving in Truk in early July where they restocked their coal supplies. While en route, they received news of the assassination of Archduke Franz Ferdinand, heir to the throne of Austria-Hungary.[12] On 17 July, the East Asia Squadron arrived in Ponape in the Caroline Islands. Here, Spee had access to the German radio network, where he learned of the Austro-Hungarian declaration of war on Serbia and the Russian mobilization. On 31 July, word came that the German ultimatum, which demanded the demobilization of Russia's armies, was set to expire. Spee ordered his ships be stripped for war.[lower-alpha 3] On 2 August, Wilhelm II ordered German mobilization against France and Russia.[13]

World War I

When World War I broke out, the East Asia Squadron consisted of Scharnhorst, Gneisenau, and the light cruisers Emden, Nürnberg, and Leipzig.[14] At the time, Nürnberg was returning from the west coast of the United States, where Leipzig had just replaced her, and Emden was still in Qingdao.[15] On 6 August 1914, Scharnhorst, Gneisenau, the supply ship Titania, and the Japanese collier Fukoku Maru were still in Ponape.[16] Spee had issued orders to recall the light cruisers, which had been dispersed on cruises around the Pacific.[17] Nürnberg joined Spee that day, after which Spee moved his ships to Pagan Island in the Northern Mariana Islands, a German possession in the central Pacific. Spee left for Pagan in the night, without Fukoku Maru, to avoid having the Japanese crew betray his movements.[16][15][lower-alpha 4]
All available colliers, supply ships, and passenger liners were ordered to meet the East Asia Squadron in Pagan[19] and Emden joined the squadron there on 12 August.[15] The auxiliary cruiser Prinz Eitel Friedrich joined Spee's ships there as well.[20] On 13 August, Commodore Karl von Müller, captain of the Emden, persuaded Spee to detach his ship as a commerce raider. The four cruisers, accompanied by Prinz Eitel Friedrich and several colliers, then departed Pagan on 15 August, bound for Chile. While en route to Enewetak Atoll in the Marshall Islands the next morning, Emden left the formation with one of the colliers. The remaining ships again coaled after their arrival in Enewetak on 20 August.[21]
To keep the German high command informed, on 8 September Spee detached Nürnberg to Honolulu to send word through neutral countries. Nürnberg returned with news of the Allied capture of German Samoa, which had taken place on 29 August. Scharnhorst and Gneisenau sailed to Apia to investigate the situation.[22] Spee had hoped to catch a British or Australian warship by surprise, but upon his arrival on 14 September, he found no warships in the harbor.[23] On 22 September, Scharnhorst and the rest of the East Asia Squadron arrived at the French colony of Papeete. The Germans attacked the colony, and in the ensuing battle of Papeete, they sank the French gunboat Zélée. The ships came under fire from French shore batteries but were undamaged.[24] Fear of mines in the harbor prevented Spee from entering the harbor to seize the coal, which the French had set on fire.[25]
By 12 October, Gneisenau and the rest of the squadron had reached Easter Island. There they were joined by the light cruisers Dresden and Leipzig, which had sailed from American waters, on 12 and 14 October, respectively. Leipzig also brought three more colliers with her.[24] After a week in the area, the ships departed for Chile.[26] On the evening of 26 October, Gneisenau and the rest of the squadron steamed out of Mas a Fuera, Chile and headed eastward, arriving in Valparaíso on 30 October. On 1 November, Spee learned from Prinz Eitel Friedrich that the British light cruiser HMS Glasgow had been anchored in Coronel the previous day, so he turned towards the port to try to catch her alone.[27][28]
Battle of Coronel

The British had scant resources to oppose the German squadron off the coast of South America. Rear Admiral Christopher Cradock commanded the armored cruisers HMS Good Hope and Monmouth, Glasgow, and the converted armed merchant cruiser Otranto. The flotilla was reinforced by the elderly pre-dreadnought battleship Canopus and the armored cruiser Defence. The latter, however, did not arrive until after the Battle of Coronel.[29] Canopus was left behind by Cradock, who probably felt her slow speed would prevent him from bringing the German ships to battle.[27]
The East Asia Squadron arrived off Coronel on the afternoon of 1 November; to Spee's surprise, he encountered Good Hope, Monmouth, and Otranto in addition to Glasgow. Canopus was still some 300 nmi (560 km; 350 mi) behind, with the British colliers.[30] At 16:17, Glasgow spotted the German ships. Cradock formed a line of battle with Good Hope in the lead, followed by Monmouth, Glasgow, and Otranto in the rear. Spee decided to hold off engaging until the sun had set more, at which point the British ships would be silhouetted by the sun, while his own ships would be obscured against the coast behind them. Spee turned his ships on a course nearly parallel to Cradock's ships, slowly closing the range. Cradock realized the uselessness of Otranto in the line of battle and detached her. Heavy seas made working the casemate guns in both sides' armored cruisers difficult.[31][32]
By 18:07, the distance between the two squadrons had fallen to 13,500 m (44,300 ft) and at 18:37 Spee ordered his ships to open fire, by which time the range had dropped to 10,400 m (34,100 ft). Each ship engaged their opposite in the British line, Gneisenau's target being Monmouth. Gneisenau struck Monmouth with her third salvo, one shell hitting her forward turret, blowing the roof off, and starting a fire. Gneisenau fired primarily armor-piercing shells and scored numerous hits, knocking out many of Monmouth's guns. By 18:50, Monmouth had been badly damaged by Gneisenau and she fell out of line; Gneisenau therefore joined Scharnhorst in battling Good Hope. At around that time, Gneisenau received a hit that struck her rear turret but did not penetrate the armor, instead exploding outside and setting fire to life jackets stored there, though the crew quickly suppressed the blaze.[33]
At the same time, Nürnberg closed to point-blank range of Monmouth and poured shells into her.[34] At 19:23, Good Hope's guns fell silent following two large explosions; the German gunners ceased fire shortly thereafter. Good Hope disappeared into the darkness. Spee ordered his light cruisers to close with his battered opponents and finish them off with torpedoes, while he took Scharnhorst and Gneisenau further south to get out of the way. Glasgow was forced to abandon Monmouth after 19:20 when the German light cruisers approached, before fleeing south and meeting with Canopus. A squall prevented the Germans from discovering Monmouth, but she eventually capsized and sank at 20:18.[35][36] More than 1,600 men were killed in the sinking of the two armored cruisers, including Cradock. German losses were negligible; Gneisenau had been hit four times but was not significantly damaged and suffered only two crewmen lightly injured. However, the German ships had expended over 40 percent of their ammunition supply.[31][37]
Voyage to the Falklands
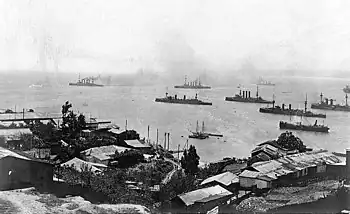
After the battle, Spee took his ships north to Valparaiso. Since Chile was neutral, only three ships could enter the port at a time; Spee took Scharnhorst, Gneisenau, and Nürnberg in first on the morning of 3 November, leaving Dresden and Leipzig with the colliers at Mas a Fuera. In Valparaiso, Spee's ships could take on coal while he conferred with the Admiralty Staff in Germany to determine the strength of remaining British forces in the region. The ships remained in the port for only 24 hours, in accordance with the neutrality restrictions, and arrived at Mas a Fuera on 6 November, where they took on more coal from captured British and French steamers. On 10 November, Dresden and Leipzig were detached for a stop in Valparaiso, and five days later, Spee took the rest of the squadron south to St. Quentin Bay in the Gulf of Penas. On 18 November, Dresden and Leipzig met Spee while en route and the squadron reached St. Quentin Bay three days later. There, they took on more coal, since the voyage around Cape Horn would be a long one and it was unclear when they would have another opportunity to coal.[38]
Once word of the defeat reached London, the Royal Navy set to organizing a force to hunt down and destroy the East Asia Squadron. To this end, the powerful battlecruisers Invincible and Inflexible were detached from the Grand Fleet and placed under the command of Vice Admiral Doveton Sturdee.[39] The two ships left Devonport on 10 November. En route to the Falkland Islands, they were joined by the armored cruisers Carnarvon, Kent, and Cornwall, the light cruisers Bristol and Glasgow, and Otranto; the force of eight ships reached the Falklands by 7 December, where they immediately coaled.[40]
In the meantime, Spee's ships departed St. Quentin Bay on 26 November and rounded Cape Horn on 2 December. They captured the Canadian barque Drummuir, which had a cargo of 2,500 t (2,461 long tons) of good-quality Cardiff coal. Leipzig took the ship under tow and the following day the ships stopped off Picton Island. The crews transferred the coal from Drummuir to the squadron's colliers. On the morning of 6 December, Spee held a conference with the ship commanders aboard Scharnhorst to determine their next course of action. The Germans had received numerous fragmentary and contradictory reports of British reinforcements in the region; Spee and two other captains favored an attack on the Falklands, while three other commanders, including Maerker, argued that it would be better to bypass the islands and attack British shipping off Argentina. Spee's opinion carried the day and the squadron departed for the Falklands at 12:00.[41]
Battle of the Falkland Islands
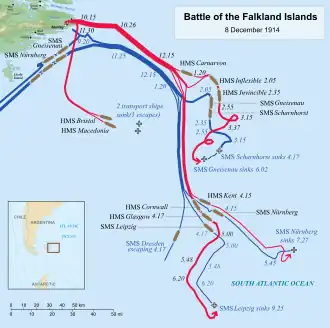
Gneisenau and Nürnberg were delegated for the attack; they approached the Falklands the following morning, with the intention of destroying the wireless transmitter there. Observers aboard Gneisenau spotted smoke rising from Port Stanley, but assumed it was the British burning their coal stocks to prevent the Germans from seizing them. As they closed on the harbor, 30.5 cm (12 in) shells from Canopus, which had been beached as a guard ship, began to fall around the German ships. Lookouts on the German ships spotted the large tripod masts of the battlecruisers, though these were initially believed to be from the battlecruiser HMAS Australia; the reports of several enemy warships combined with fire from Canopus prompted Spee to break off the attack.[40][42] The Germans took a southeasterly course at 22 kn (41 km/h; 25 mph) after having reformed by 10:45.[43] Spee formed his line with Gneisenau and Nürnberg ahead, Scharnhorst in the center, and Dresden and Leipzig astern.[44] The fast battlecruisers quickly got up steam and sailed out of the harbor to pursue the East Asia Squadron.[40]
Spee realized his armored cruisers could not escape the much faster battlecruisers and ordered the three light cruisers to attempt to break away while he turned about and allowed the British battlecruisers to engage the outgunned Scharnhorst and Gneisenau. Meanwhile, Sturdee detached his cruisers to pursue the German light cruisers.[45] Invincible opened fire at Scharnhorst while Inflexible attacked Gneisenau and Spee ordered his two armored cruisers to similarly engage their opposites. Spee had taken the lee position; the wind kept his ships swept of smoke, which improved visibility for his gunners. This forced Sturdee into the windward position and its corresponding worse visibility. Gneisenau quickly scored two hits on her opponent. In response to these hits, Sturdee attempted to widen the distance by turning two points to the north. This would place his ships beyond the effective range of the German guns, but keep his opponents within range of his own. Both sides checked their fire for the time being; Gneisenau had been hit twice during this stage of the battle, the first shell striking the aft funnel, killing and wounding several men with shell splinters. The second shell damaged some of the ship's cutters and penetrated into some cabins amidships. Shell fragments from a near miss penetrated into one of the magazines for the 8.8 cm guns, forcing it to be flooded to prevent a fire.[46]
Spee countered Sturdee's maneuver by turning rapidly to the south, which significantly widened the range and temporarily raised the possibility of escaping by nightfall. The maneuver forced Sturdee to turn south as well and pursue at high speed. Given the speed advantage and the clear weather, the German hope to escape proved to be short-lived. Nevertheless, the maneuver allowed Spee to turn back north, bringing Scharnhorst and Gneisenau close enough to engage with their secondary 15 cm guns; their shooting was so effective that it forced the British to haul away a second time. After resuming the battle, the British gunfire became more accurate, and as the British were firing at very long range, the shells approached plunging fire, which allowed them to penetrate the thin deck armor rather than the thicker belt. Gneisenau took several hits during this phase, including a pair of underwater hits that began to flood boiler rooms 1 and 3.[47]
.jpg.webp)
Sturdee then turned to port in an attempt to take the leeward position, but Spee countered the turn to retain his favorable position; the maneuvering did, however, reverse the order of the ships, so Gneisenau now engaged Invincible.[48] During the reversal, Gneisenau became temporarily obscured by smoke, so the British ships concentrated their fire on Scharnhorst, which suffered severe damage during this phase of the action. Spee and Maerker exchanged a series of signals to determine the state of each other's vessels; Spee concluded the exchange with a signal noting that Maerker was correct to have opposed the attack on the Falklands. At 15:30, Gneisenau received a major hit that penetrated to her starboard engine room and disabled that engine, leaving her with just two operational screws. Another hit at 15:45 knocked over her forward funnel, and at 16:00 her number 4 boiler room was disabled.[49]
At 16:00, Spee ordered Gneisenau to attempt to escape while he reversed course and attempted to launch torpedoes at his pursuers. Damage to the ship's engine and boiler rooms had reduced her speed to 16 kn (30 km/h; 18 mph), however, and so the ship continued to fight on. Gneisenau nevertheless could not evade British fire, and at around the same time her bridge was hit. Two more hits followed at 16:15, one passing completely through the ship without detonating and the other exploding in the main dressing station, killing most of the wounded crew there. At 16:17, Scharnhorst finally capsized to port and sank; the British, their attention now focused on Gneisenau, made no attempt to rescue the crew. By this time, Carnarvon joined the fray and contributed her guns to the bombardment. As the range fell to 8,500 m (27,900 ft), heavy fire from the surviving German guns forced the British to turn away again, widening the range to 13,500 m (44,300 ft).[50]
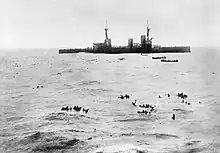
During the final phase of the battle, Gneisenau ran out of ammunition and resorted to firing inert training rounds; one of these struck Invincible. Three more shells struck Gneisenau at around 17:15, two of them underwater on the starboard side and the other on a starboard casemate. The former hits caused serious flooding, but the third had little effect, as the gun crew had already been killed by an earlier hit and the casemate was already on fire. Several more hits followed, and by 17:30, Gneisenau was a burning wreck; she had a severe list to starboard and smoke poured from the ship, which came to a stop. At 17:35, Maerker ordered the crew to set scuttling charges and gather on the deck, as the ship was unable to continue fighting. The forward gun turret fired a final shell despite Maerker's instructions, prompting a return shot from Inflexible that struck the forward dressing station, killing many wounded men there. At 17:42, the scuttling charges detonated and the forward torpedo crew launched a torpedo to clear the tube and hasten the flooding.[51][52]
The ship slowly rolled over and sank, but not before allowing some 270 to 300 of the survivors time to escape. Of these men, many died quickly from exposure in the 4 °C (39 °F) water.[53] A total of 598 men of her crew were killed in the engagement,[2] though boats from Invincible and Inflexible picked up 187 men from Gneisenau, including her executive officer, Korvettenkapitän (Corvette Captain) Hans Pochhammer, the highest ranking German officer to survive and the source of German records of the battle.[54][55] Leipzig and Nürnberg were also sunk. Only Dresden managed to escape, but she was eventually tracked to the Juan Fernandez Islands and sunk. The complete destruction of the squadron killed some 2,200 German sailors and officers, including Spee and two of his sons.[56]
Notes
Footnotes
- ↑ "SMS" stands for "Seiner Majestät Schiff" (English: His Majesty's Ship).
- ↑ In Imperial German Navy gun nomenclature, "SK" (Schnelladekanone) denotes that the gun is quick loading, while the L/40 denotes the length of the gun. In this case, the L/40 gun is 40 calibers, meaning that the gun is 40 times as long as it is in bore diameter.[3]
- ↑ This meant the removal of all non-essential items, to include dress uniforms, tapestries, furniture, and other flammable objects.[lower-alpha 5]
- ↑ Japan, though still neutral, was allied with Britain and would soon enter the war against Germany.[18]
- Hough, p. 17.
Citations
- ↑ Dodson, pp. 58–59, 67.
- 1 2 3 4 5 Gröner, p. 52.
- ↑ Grießmer, p. 177.
- ↑ Dodson, p. 206.
- 1 2 3 Hildebrand, Röhr, & Steinmetz Vol. 3, pp. 211–212.
- ↑ Hildebrand, Röhr, & Steinmetz Vol. 2, p. 238.
- 1 2 Hildebrand, Röhr, & Steinmetz Vol. 3, p. 212.
- ↑ Hildebrand, Röhr, & Steinmetz Vol. 7, pp. 108–109.
- 1 2 Hildebrand, Röhr, & Steinmetz Vol. 3, pp. 211–213.
- ↑ Hildebrand, Röhr, & Steinmetz Vol. 7, pp. 109–110.
- ↑ Hildebrand, Röhr, & Steinmetz Vol. 3, p. 211.
- ↑ Hough, pp. 11–12.
- ↑ Hough, pp. 17–18.
- ↑ Halpern, p. 66.
- 1 2 3 Staff, p. 29.
- 1 2 Halpern, p. 71.
- ↑ Hough, pp. 1–2.
- ↑ Halpern, pp. 71–74.
- ↑ Hough, pp. 3–4.
- ↑ Hough, p. 5.
- ↑ Hough, pp. 23, 33.
- ↑ Strachan, p. 471.
- ↑ Staff, pp. 29–30.
- 1 2 Staff, p. 30.
- ↑ Halpern, p. 89.
- ↑ Hawkins, p. 34.
- 1 2 Halpern, p. 92.
- ↑ Staff, pp. 30–31.
- ↑ Herwig, p. 156.
- ↑ Halpern, pp. 92–93.
- 1 2 Halpern, p. 93.
- ↑ Staff, pp. 32–33.
- ↑ Staff, pp. 33–35.
- ↑ Herwig, p. 157.
- ↑ Staff, p. 36.
- ↑ Strachan, p. 36.
- ↑ Staff, p. 39.
- ↑ Staff, pp. 58–59.
- ↑ Strachan, p. 41.
- 1 2 3 Strachan, p. 47.
- ↑ Staff, pp. 61–62.
- ↑ Staff, pp. 62–63.
- ↑ Staff, p. 64.
- ↑ Bennett, p. 115.
- ↑ Bennett, p. 117.
- ↑ Staff, p. 66.
- ↑ Staff, pp. 66–67.
- ↑ Bennett, p. 118.
- ↑ Staff, pp. 68–69.
- ↑ Staff, pp. 69–71.
- ↑ Bennett, pp. 119–120.
- ↑ Staff, p. 71.
- ↑ Bennett, p. 120.
- ↑ Hildebrand, Röhr, & Steinmetz Vol. 3, p. 213.
- ↑ Hough, p. 152.
- ↑ Herwig, p. 158.
References
- Bennett, Geoffrey (2005). Naval Battles of the First World War. Barnsley: Pen & Sword Military Classics. ISBN 978-1-84415-300-8.
- Dodson, Aidan (2016). The Kaiser's Battlefleet: German Capital Ships 1871–1918. Barnsley: Seaforth Publishing. ISBN 978-1-84832-229-5.
- Grießmer, Axel (1999). Die Linienschiffe der Kaiserlichen Marine: 1906–1918; Konstruktionen zwischen Rüstungskonkurrenz und Flottengesetz [The Battleships of the Imperial Navy: 1906–1918; Constructions between Arms Competition and Fleet Laws] (in German). Bonn: Bernard & Graefe Verlag. ISBN 978-3-7637-5985-9.
- Gröner, Erich (1990). German Warships: 1815–1945. Vol. I: Major Surface Vessels. Annapolis: Naval Institute Press. ISBN 978-0-87021-790-6.
- Halpern, Paul G. (1995). A Naval History of World War I. Annapolis: Naval Institute Press. ISBN 978-1-55750-352-7.
- Hawkins, Nigel (2002). Starvation Blockade: The Naval Blockades of WWI. Annapolis: Naval Institute Press. ISBN 978-0-85052-908-1.
- Herwig, Holger (1998) [1980]. "Luxury" Fleet: The Imperial German Navy 1888–1918. Amherst: Humanity Books. ISBN 978-1-57392-286-9.
- Hildebrand, Hans H.; Röhr, Albert & Steinmetz, Hans-Otto (1993). Die Deutschen Kriegsschiffe: Biographien: ein Spiegel der Marinegeschichte von 1815 bis zur Gegenwart (Band 2) [The German Warships: Biographies: A Reflection of Naval History from 1815 to the Present (Volume 2)] (in German). Ratingen: Mundus Verlag. ISBN 978-3-7822-0210-7.
- Hildebrand, Hans H.; Röhr, Albert & Steinmetz, Hans-Otto (1993). Die Deutschen Kriegsschiffe: Biographien: ein Spiegel der Marinegeschichte von 1815 bis zur Gegenwart (Band 3) [The German Warships: Biographies: A Reflection of Naval History from 1815 to the Present (Volume 3)] (in German). Ratingen: Mundus Verlag. ISBN 978-3-7822-0211-4.
- Hildebrand, Hans H.; Röhr, Albert & Steinmetz, Hans-Otto (1993). Die Deutschen Kriegsschiffe: Biographien: ein Spiegel der Marinegeschichte von 1815 bis zur Gegenwart (Band 7) [The German Warships: Biographies: A Reflection of Naval History from 1815 to the Present (Volume 7)] (in German). Ratingen: Mundus Verlag. ISBN 978-3-7822-0267-1.
- Hough, Richard (1980). Falklands 1914: The Pursuit of Admiral Von Spee. Penzance: Periscope Publishing. ISBN 978-1-904381-12-9.
- Staff, Gary (2011). Battle on the Seven Seas: German Cruiser Battles, 1914–1918. Barnsley: Pen & Sword Maritime. ISBN 978-1-84884-182-6.
- Strachan, Hew (2001). The First World War: Volume 1: To Arms. Oxford: Oxford University Press. ISBN 978-0-19-926191-8.