Robot calibration is a process used to improve the accuracy of robots, particularly industrial robots which are highly repeatable but not accurate. Robot calibration is the process of identifying certain parameters in the kinematic structure of an industrial robot, such as the relative position of robot links. Depending on the type of errors modeled, the calibration can be classified in three different ways. Level-1 calibration only models differences between actual and reported joint displacement values, (also known as mastering). Level-2 calibration, also known as kinematic calibration, concerns the entire geometric robot calibration which includes angle offsets and joint lengths. Level-3 calibration, also called a non-kinematic calibration, models errors other than geometric defaults such as stiffness, joint compliance, and friction. Often Level-1 and Level-2 calibration are sufficient for most practical needs.[1][2]
Parametric robot calibration is the process of determining the actual values of kinematic and dynamic parameters of an industrial robot (IR). Kinematic parameters describe the relative position and orientation of links and joints in the robot while the dynamic parameters describe arm and joint masses and internal friction.[3]
Non-parametric robot calibration circumvents the parameter identification. Used with serial robots, it is based on the direct compensation of mapped errors in the workspace. Used with parallel robots, non-parametric calibration can be performed by the transformation of the configuration space.
Robot calibration can remarkably improve the accuracy of robots programmed offline. A calibrated robot has a higher absolute as well as relative positioning accuracy compared to an uncalibrated one; i.e., the real position of the robot end effector corresponds better to the position calculated from the mathematical model of the robot. Absolute positioning accuracy is particularly relevant in connection with robot exchangeability and off-line programming of precision applications. Besides the calibration of the robot, the calibration of its tools and the workpieces it works with (the so-called cell calibration) can minimize occurring inaccuracies and improve process security.
Accuracy criteria and error sources
The international standard ISO 9283[4] sets different performance criteria for industrial robots and suggests test procedures in order to obtain appropriate parameter values. The most important criteria, and also the most commonly used, are pose accuracy (AP) and pose repeatability (RP). Repeatability is particularly important when the robot is moved towards the command positions manually ("Teach-In"). If the robot program is generated by a 3D simulation (off-line programming), absolute accuracy is vital, too. Both are generally influenced negatively by kinematic factors. Here especially the joint offsets and deviations in lengths and angles between the individual robot links take effect.
Measurement systems
There exist different possibilities for pose measurement with industrial robots, e.g. touching reference parts, using supersonic distance sensors, laser interferometry, theodolites, calipers or laser triangulation. Furthermore, there are camera systems which can be attached in the robot's cell or at the IR mounting plate and acquire the pose of a reference object. Measurement and calibration systems are made by such companies as Bluewrist, Dynalog, RoboDK, FARO Technologies, Creaform, Leica, Metris, Metronor, Wiest, Teconsult[5] and Automated Precision.
Mathematical principles

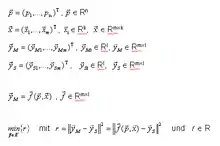
The robot errors gathered by pose measurements can be minimized by numerical optimization. For kinematic calibration, a complete kinematical model of the geometric structure must be developed, whose parameters can then be calculated by mathematical optimization. The common system behaviour can be described with the vector model function as well as input and output vectors (see figure). The variables k, l, m, n and their derivates describe the dimensions of the single vector spaces. Minimization of the residual error r for identification of the optimal parameter vector p follows from the difference between both output vectors using the Euclidean norm.
For solving the kinematical optimization problems least-squares descent methods are convenient, e.g. a modified quasi-Newton method. This procedure supplies corrected kinematical parameters for the measured machine, which then, for example, can be used to update the system variables in the controller to adapt the used robot model to the real kinematics.[6]
Results

The positioning accuracy of industrial robots varies by manufacturer, age, and robot type. Using kinematic calibration, these errors can be reduced to less than a millimeter in most cases. An example of this is shown in the figure to the right.
Accuracy of 6-axis industrial robots can improved by a factor of 10.[7]
Accuracy of parallel robots after calibration can be as low as a tenth of a millimeter.
Sample applications

In the industry, there is a general trend towards substitution of machine tools and special machines by industrial robots for certain manufacturing tasks whose accuracy demands can be fulfilled by calibrated robots. Through simulation and off-line programming, it is possible to easily accomplish complex programming tasks, such as robot machining. However, contrary to the teach programming method, good accuracy as well as repeatability is required.
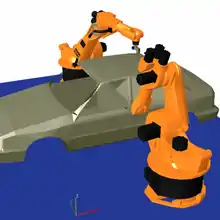
In the figure, a current example is shown: In-line measurement in automotive manufacturing, where the common "measurement tunnel" used for 100% inspection with many expensive sensors are partly replaced by industrial robots that carry only one sensor each. This way the total costs of a measurement cell can be reduced significantly. The station can also be re-used after a model change by simple re-programming without mechanical adaptations.
Further examples for precision applications are robot-guided hemming in car body manufacturing, assembly of mobile phones, drilling, riveting and milling in the aerospace industry, and increasingly in medical applications.
See also
Literature
- Tagiyev, N.; Alizade, R.: A Forward and Reverse Displacement Analysis for a 6-DOF In-Parallel Manipulator. In: Mech. Mach. Theory, Vol. 29, No. 1, London 1994, pp. 115–124.
- Trevelyan, J. P.: Robot Calibration with a Kalman Filter. Presentation at International Conference on Advanced Robotics and Computer Vision (ICARCV96), Singapore 1996.
- N.N.: ISO 9283 - Manipulating industrial robots. Performance criteria and related test methods. ISO, Geneva 1998.
- Beyer, L.; Wulfsberg, J.: Practical Robot Calibration with ROSY. In: Robotica, Vol. 22, Cambridge 2004, pp. 505–512.
- Y. Zhang and F. Gao, “A calibration test of Stewart platform,” 2007 IEEE International Conference on Networking, Sensing and Control, IEEE, 2007, pp. 297–301.
- A. Nubiola and I.A. Bonev, "Absolute calibration of an ABB IRB 1600 robot using a laser tracker," Robotics and Computer-Integrated Manufacturing, Vol. 29 No. 1, 2013, pp. 236–245.
- Gottlieb, J.: Non-parametric Calibration of a Stewart Platform. In: Proceedings of 2014 Workshop on Fundamental Issues and Future Research Directions for Parallel Mechanisms and Manipulators July 7–8, 2014, Tianjin, China.
- Nof, Shimon Y. Handbook of industrial robotics (Chapter 5, Section 9). Vol. 1. John Wiley & Sons, 1999.
References
- ↑ Nubiola, Albert; Bonev, Ilian A. (2013-02-01). "Absolute calibration of an ABB IRB 1600 robot using a laser tracker". Robotics and Computer-Integrated Manufacturing. 29 (1): 236–245. doi:10.1016/j.rcim.2012.06.004.
- ↑ Nof, Shimon Y (1999). Handbook of industrial robotics (Vol 1 ed.). Wiley and Sons. pp. 72–74.
- ↑ Lightcap, C.; Banks, S. (2007-10-01). "Dynamic identification of a mitsubishi pa10-6ce robot using motion capture". 2007 IEEE/RSJ International Conference on Intelligent Robots and Systems. pp. 3860–3865. doi:10.1109/IROS.2007.4399425. ISBN 978-1-4244-0911-2. S2CID 14339917.
- ↑ "ISO 9283:1998 - Manipulating industrial robots -- Performance criteria and related test methods". ISO. Retrieved 2017-01-03.
- ↑ "Helmut Schmidt University".
- ↑ "Parallel Kinematics Calibration Without Parameter Identification". Scribd. Retrieved 2017-01-03.
- ↑ RoboDK. "Robot calibration - RoboDK". www.robodk.com. Retrieved 2017-01-03.