| New Zealand Mounted Rifles Brigade | |
|---|---|
 Brigade marching through Cairo 1914 | |
| Active | 1914–19 |
| Country | New Zealand |
| Allegiance | |
| Branch | New Zealand Army |
| Type | Mounted infantry |
| Size | Brigade |
| Part of | New Zealand Expeditionary Force New Zealand and Australian Division ANZAC Mounted Division |
| Nickname(s) | "The Mounteds"[1] |
| Engagements | First World War Egyptian Revolution of 1919 |
| Commanders | |
| (1914–15) | Andrew Russell |
| (1915–17) | Edward Chaytor |
| (1917–19) | William Meldrum |
| Insignia | |
| Unit colour patch | |
| Abbreviation | NZMRB |
The New Zealand Mounted Rifles Brigade was a brigade of the New Zealand Army during the First World War. Raised in 1914 as part of the New Zealand Expeditionary Force, it was one of the first New Zealand units to sail for service overseas.
The brigade was formed from three regiments – the Auckland Mounted Rifles, the Canterbury Mounted Rifles, the Wellington Mounted Rifles – and smaller support units. Altogether the brigade had an establishment of 1,940 men and 2,032 horses and by the end of the war over 17,700 men had served in the brigade. However, the entire brigade's dismounted rifle strength was the equivalent of only a battalion of infantry.
By the end of 1914, the brigade had arrived in British Egypt and was assigned to the New Zealand and Australian Division. Its first active service was, in a dismounted role, during the Gallipoli Campaign, where they fought against the forces of the Ottoman Turkish Empire.[nb 1] Seven months later, after the evacuation from Gallipoli, the brigade returned to Egypt, and in 1916, became part of the ANZAC Mounted Division. The brigade was then used in defence of the Suez Canal. Then following an abortive Turkish attack in the Sinai Desert, it took part in clearing the invaders from Egypt. Then in the next two years, it forced the Turkish forces out of Palestine, collectively known as the Sinai and Palestine Campaign. Following its successful conclusion in 1918, the brigade played a small part in the Egyptian Revolution of 1919, before being disbanded in June 1919.
As of 2022 one mounted rifles unit (Queen Alexandra's Mounted Rifles) is retained in the modern New Zealand Army.
Background

On 4 August 1914, the British Empire declared war on the German Empire. Two days later, to assist the war effort, New Zealand offered to send a New Zealand Expeditionary Force (NZEF) to fight alongside the British Army. That offer was accepted by the Imperial Cabinet and amongst the troops asked for was a mounted infantry brigade. Which became known as the New Zealand Mounted Rifles Brigade.[3] Being mounted infantry the brigade was expected to ride to the site of the battle, then dismounted and fight on foot, just like normal infantry.[4]
The brigade's first commanding officer was Colonel Andrew Russell.[1] His command comprised a headquarters, three regiments, each with three squadrons, and support troops, formed from the New Zealand Territorial Force,[5] The Territorial Force included a compulsory training system and the four New Zealand Military Districts were required to supply a mounted regiment for the NZEF. To meet that obligation the Territorial Force regiments, each provided a squadron, which kept their own regimental badges and traditions.[6] All together the brigade has an establishment of 1,940 men and 2,032 horses.[7][nb 2] However the entire brigade only had a dismounted rifle strength the equivalent of an infantry battalion.[1] Such was the nature of the fighting they were involved in, that by the end of the war over 17,700 men would serve in the brigade.[9]
Formation
|
New Zealand Mounted Rifles Brigade
|
Initially, in 1914, the brigade comprised a Brigade Headquarters, three mounted regiments, the Auckland Mounted Rifles, the Canterbury Mounted Rifles, the Wellington Mounted Rifles, and support units, from the New Zealand Engineers, a Field Ambulance and an Ammunition Subsection.[7] New Zealand did not supply an artillery battery for the brigade, as it was always intended artillery would be provided by the British Army.[4] Another regiment, the Otago Mounted Rifles, raised as a divisional cavalry regiment, was assigned to the brigade during the Gallipoli Campaign.[9] Then in the early stages of the Sinai Campaign the Australian 5th Light Horse Regiment, for a time, replaced the Wellington Mounted Rifles.[10] In July 1916, the three regiments lost their machine-gun sections, which were amalgamated, to form the Brigade Machine-Gun Squadron.[11]
Training in New Zealand
In New Zealand, the brigade's reinforcements trained at Featherston Camp north east of Wellington where about 8,000 men were housed in nearly 300 buildings, including three billiard rooms, a post office, a cinema, sixteen dining halls, six cook-houses and stables for 500 horses. The training programme included eight weeks of dismounted drill, two weeks of shooting, eight weeks of mounted drill and lectures on sanitation, military law and discipline, animal management and stable duties. All mounted reinforcements had to pass confirmatory riding tests before being cleared to go overseas.[12] Once trained the men were sent to Sydney or Melbourne in Australia, where they embarked on Australian troopships bound for Suez.[13]
Egypt
A little over two months after the declaration of war, in October 1914, the brigade sailed from New Zealand.[14] Arriving in the Suez Canal on 3 December 1914, they disembarked at Alexandria two days later.[15] Then entrained for Cairo, and established a camp in the western suburb of Zeitoun.[16] The brigade was now assigned to the New Zealand and Australian Division, with the New Zealand Infantry Brigade, and two Australian brigades' the 1st Light Horse Brigade and the 4th Brigade.[17] On 18 December Egypt until then a Turkish province, came under the protection of the British Empire, and the Khedive was replaced by Prince Hussein Kamel Pasha, as the Sultan of Egypt. Three days after his coronation the brigade, in a display of strength, marched through Cairo.[18]
The brigade used their time training, which consisted of day and night marches through the desert, combined with rifle and machine-gun practice.[19] Culminating in a four-day exercise, in February, when they marched around twenty-five miles (40 km) each day.[20] In April the division's two infantry brigades were given orders to leave for a then-unknown destination.[21] Which was followed by the news of the Gallipoli landings. Then a week later the brigade was ordered to prepare to follow the rest of the division. However, they would leave their horses behind serving in a dismounted role.[22]
Gallipoli
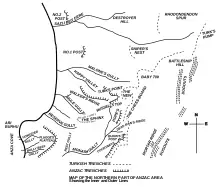
The brigade's transport ships arrived off Gallipoli on 12 May. The troops were kept on board until dark, then landed at Anzac Cove, camping that night on the beach.[23] The next day they took over the northern, No.4 Section, of the beachhead. Relieving the Royal Naval Brigade, on Walkers Ridge, brigade headquarters was set up on the highest point of the ridge, which became known as Russell's Top.[24] The Wellington Mounted Rifles were on the right, looking down into Monash Valley, the Auckland Mounted Rifles in the centre and the Canterbury Mounted rifles on their left, on the slopes down to the sea, with responsibility for the No.1 and No.2 Posts.[25] The No.2 Post was the beach-heads furthest north position, only two miles (3.2 km) from Chatham's Post the southernmost point.[26] The outlying position of the two posts meant that movement between them and the main lines, could only be done safely at night.[27]
Defence of Walker's Ridge
In May intelligence reports indicated that Turkish reinforcements were grouping around the ANZAC positions, preparing an attack.[28] Just after midnight 19 May, from No.2 Post to Chathams Post, the Turks opened fire with their small arms and artillery, and threw hand grenades at the ANZAC trenches.[28] This continued until 03:30 when the Turkish infantry went over the top. In the brigade's sector their main effort fell on the Auckland Mounted Rifles. They held their fire until the Turks were around twenty yards (18 m) away. Then every weapon opened up, the machine-guns causing severe casualties amongst the attackers, who were forced to go to ground and take cover. At daybreak they Turks started to retire to their own lines leaving thousands of dead behind, 500 of them in front of the Auckland's positions.[29] The Canterbury Mounted Rifles defending in No.2 Post, then observed a Turkish force opposite Walker's Ridge, forming for another attack. One of their machine-guns catching them with enfilade fire, broke up the gathering and forced them to withdraw.[30] The rest of the day was quiet, apart from both sides artillery, then on 20 May another Turkish attack began, but faltered in the face of the brigade's machine-gun fire and withdrew back to their own lines.[31] That afternoon white flags appeared above the Turkish trenches, and all the firing stopped. It appeared they wanted a truce to collect their wounded but instead started collecting arms and ammunition and bringing forward reinforcements. The brigade issued a warning that they would commence firing in ten minutes, and they returned to their trenches.[32] However an armistice was later agreed for the 24 May, between 07:30 and 16:30, so they could bury the dead.[32] The Turkish troops, were also observed improving and constructing new trenches at the Nek, Baby 700, and further north on Battleship Hill and along the Sari Bair hills.[33]
No.3 Post
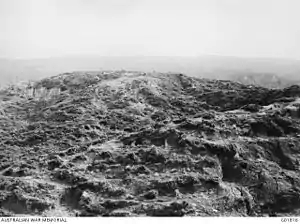
On 27 May the brigade realised the Turks were building a new position, at the base of the foothills, around 450 yards (410 m) east of the No.2 Post and when completed it would be a danger to the New Zealand post. So it would have to be captured and the task was given to the 1st Squadron, Canterbury Mounted Rifles. The squadron assembled at No.2 Post and after dark, at 22:00, 28 May assaulted the position, and by 23:30 had forced the Turkish defenders to withdraw.[34][35]
Once secured the 6th Squadron Wellington Mounted Rifles, carrying spades and picks to improve the defences, moved in to occupy the position. Now known as No.3 Post, the squadron was ordered to "hold the post till relieved".[35] Digging through the night, at daybreak they had to stop and take cover when the post came under fire from the surrounding hills.[36] Unable to do anything but take cover all day, that night at 21:30 the 6th Squadron was relieved by the 9th Squadron Wellington Mounted Rifles. The squadron attempted to improve their defences, but thirty minutes later around 1,000 Turks had surrounded, and attacked the post and by 23:30 had cut the telephone wires to the rest of the brigade. The dead ground to their front meant the defenders had to expose themselves on the trench parapet to open fire, which for a time kept the attackers at bay. But the strength of the Turkish attack enabled them to advance to the edge of the New Zealander's trenches.[36][37] At midnight the 2nd Squadron Wellington Mounted Rifles, were sent forward to reinforce the position. But were unable to break through the Turkish lines and had to establish their own defensive position on the slopes between No.2 and No.3 Posts.[38] At 03:00 the 9th Squadron, opened fire on and thwarted a Turkish assault building in the south of the post. Then thirty minutes later the Turks again attacked No.3 Post, with hand grenades and their small arms. However, the 2nd Squadron could now assist with covering fire, from their position.[39] At dawn one of the 2nd Squadron's troops, counter-attacked and cleared the Turks out of the trenches to the left of No.2 Post. At 06:30, using signal flags 9th Squadron re-established communications with brigade headquarters. Throughout the day both squadrons held their positions, but ammunition and supplies were running low. So the 6th Squadron Wellington Mounted Rifles was sent forward to join the 2nd Squadron, but in the face of the Turkish firepower, they could not advance any further. The Turkish, now estimated to number around 3,000 men, continued attacking all day to capture No.3 Post.[39] At 19:10 the 9th Squadron reported they had lost the northern side of the post, which had been captured by the Turks. During the same time the 6th Squadron had managed to advance to within 100 yards (91 m) of the post. However, as it got dark the Turkish attacks petered out and at 22:30 the 10th Squadron and half of the 8th Squadron Canterbury Mounted Rifles managed to break through to No.3 Post and relieved the defenders. The Canterbury Mounted Rifles now occupied the post and fought off several Turkish attacks.[40][41] But events had convinced the high command that it was impossible to defend No.3 Post and it was abandoned the same night. The brigade's casualties, were forty-two dead and 109 wounded.[42] On 28 May the Otago Mounted Rifles, which had been attached to the brigade, took over from the Canterbury Mounted Rifles in the front line.[43]
Chunuk Bair
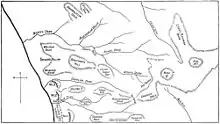
The objective of the British August offensive was to seize Chunuk Bair, a high point in the Sari Bair mountain range. The New Zealand and Australian Division would provide the attacking force. The initial part of the attack was to clear the Turks from the foothills, which was given to the New Zealand Mounted Rifles Brigade, reinforced by a Māori Pioneer Battalion.[44]
The attack began over the night of 5/6 August the Auckland Mounted Rifles successfully captured the Old No.3 Post.[45] To their left the Canterbury and Otago Mounted rifles without firing a shot, only using their bayonets, cleared the Chailak Dere valley, then advanced to Aghyl Dere in the north. Capturing Taylor's Hollow, Walden's Point, and finally Beauchop Hill.[46] To the right the Wellington Mounted Rifles and the Māoris captured Destroyer Ridge, and then scaled the north-east face of Table Top and at 22:55 attacked the Turks from the rear capturing the position.[47]
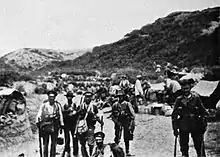
The next day the Auckland and Canterbury Mounted Rifles, the New Zealand Infantry Brigade and two British battalions, were combined as No.1 Column commanded by Brigadier-General Francis Earl Johnston. The Column were to hold the ground already occupied and extend their lines to the south and east. When they reported to Johnstone at "Chailak Dere", where they ordered to hold the position "to the last man". All during the following day, the attacking Turks sky-lining themselves moving over the hill, becoming easy targets for the defenders, and were engaged with enfilade fire.[48]
Holding out until they were relived on 9 August, the brigade, which was understrength to start with, had virtually ceased to exist as a fighting unit. The Auckland Mounted Rifles only had sixty-six men from a strength of 310 all ranks that had started the battle.[45] The Canterbury Mounted Rifles lost 105 men around forty percent of their strength.[49] The Wellington Mounted Rifles, had sixty-seven men left from 173 all ranks.[50]
Hill 60
Two weeks later the Canterbury and Otago Mounted Rifles were selected to take part in the next battle to capture Hill 60. At 15:30 21 August the battle began, the Canterbury Mounted Rifles charging straight at the hill suffered sixty percent casualties, among them their commanding officer. They did however succeed in capturing the Turkish trench, within fifteen minutes of going over the top. But on either side of them, the rest of the attack had failed, leaving the two regiments isolated from the rest of the force. By themselves, the two regiments did not have the manpower to continue the assault, so they were ordered to dig in and hold the position.[51][52] Which they did until 23 August when they were relieved by the Auckland and Wellington Mounted Rifles.[53]
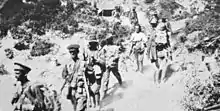
On 27 August a second attempt to capture Hill 60 began. At 17:00 the Auckland and Canterbury Mounted Rifles captured the Turkish front line. The Wellington and Otago Mounted Rifles following up, passed beyond them and captured the Turkish reserve line. On the other flanks the supporting assaults had failed, leaving the Wellington and Otago Mounted Rifles isolated on a narrow front. So the brigade consolidated the ground already captured and moved forward their machine-guns, to support the defence, the forward line of which only consisted of forty men. However, all four regiments suffered heavy casualties and had to fight off several counter-attacks. Until 29 August when they were relieved and moved to the rear.[54][55]
Evacuation
In September the brigade, now only twenty officers and 229 other ranks, was relieved by the Australians and left the peninsula for the rest camp on the island of Lemnos, arriving at Moudros on 14 September.[56] While recuperating the survivors were joined by, thirty officers and 1,060 other ranks, replacements for their casualties.[57]
On 10 November the brigade returned to Gallipoli,[58] Moving back into the front line, they were not involved in any more assaults. Then on 12 December orders for the evacuation were issued. The first men to leave were anyone with the slightest illness. Then one regiment or battalion from each brigade, the Auckland Mounted Rifles, were chosen, from the brigade.[59] This meant that the remainder had to extend their lines covering for them. The last men were due to leave over the night of 19/20 December.[60] Each regiment was divided into three groups, the first group leaving at the 17:30 19 December, followed by the second smaller group at 21:35. The last group of men having to cover for the whole brigade kept up a steady rate of fire and moved their machine-guns around the position to support the deception that all defences were fully manned. The last group was also divided into three, the first of which left at 01:45 20 December. Followed by the next group who waited ten minutes then followed them and the last small group of men left at 02:05. Once on the evacuation beach, they boarded their transport ships they sailed back to Lemnos. Then on 22 December returned to Egypt, arriving at Alexandria on 26 December, and eventually arrived back at their old camp at Zeitoun.[61] During the campaign 4,000 men served with the brigade and almost fifty percent of them, 727 dead and 1,239 wounded, became casualties.[9]
Sinai
In January 1916, the brigade left Zeitoun and headed east camping that night beside the Great Bitter Lake on the Suez Canal. While here they conducted desert training and each squadron, in turn, was sent across the canal on reconnaissance patrols into the Sinai Desert. In February they carried out a dual role of manning trenches along the canal, dismounted, and doing long range mounted patrols into the Sinai.[62] Then in March, the brigade was assigned to the newly formed ANZAC Mounted Division, alongside the Australian 1st, 2nd and 3rd Light Horse Brigades.[63]
Katia
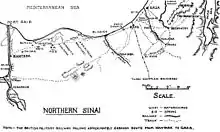
Without any notice at 20:30 23 April, the brigade was ordered to Kantara thirty-two miles (51 km) away on the Suez Canal. The reason was not then known, but it later transpired a Turkish force in the Sinai Desert had attacked British yeomanry positions at Katia and Oghratina.[64] They reached Kantara at 07:00 and an hour later moved into the desert camping at Hill 70 for the night and sent out reconnaissance patrols into the desert and manned observation posts.[65] Patrol activity was kept up, most of the time at troop strength, but some involved the complete brigade.[66] On 15 July 1916, the three mounted regiments lost their machine-gun sections, which were transferred to the newly formed brigade Machine-Gun Squadron. However, a shortage of equipment meant that they only had six of the newer Vickers machine guns and six older Maxim guns.[11] Four days later, reconnaissance aircraft spotted a large Turkish force moving west across the desert.[67]
Romani
Abd
Magdhaba
Palestine
Rafa
Gaza
Beersheba
Ayun Kara
River Auja
Jordan Valley
Jericho
Amman
Es Salt
Chaytor's Force

Post war
The New Zealand Mounted Rifles were the probable main participants in the Surafand Massacre of Palestinian Arab civilians on 10 December 1918 in revenge for the murder of a New Zealand soldier and other previous incidents; some Australian and possibly British troops were also present.
References
- Footnotes
- ↑ At the time of the First World War, the modern Turkish state did not exist, and instead it was part of the Ottoman Turkish Empire. While the terms have distinct historical meanings, within many English-language sources the term "Turkey" and "Ottoman Empire" are used synonymously, although many academic sources differ in their approaches.[2] The sources used in this article predominately use the term "Turkey".
- ↑ Wilkie has the brigade strength at ninety-eight officers, 1,842 other ranks.[8]
- Citations
- 1 2 3 Kinloch 2005, p.32
- ↑ Fewster, Basarin, Basarin 2003, pp.xi–xii
- ↑ Kinloch 2005, p.29
- 1 2 Kinloch 2005, p.31
- ↑ "Auckland Mounted Rifles Regiment". New Zealand History. Retrieved 5 November 2013.
- ↑ Waite 1919, p.6
- 1 2 Kinloch 2005, p.30
- ↑ Wilkie 1924, p.19
- 1 2 3 Kinloch 2005, p.15
- ↑ Powles 1928, p.106
- 1 2 Luxford 1923, pp.178–179
- ↑ Kinloch 2005 pp. 242–3
- ↑ Kinloch 2005 p. 243
- ↑ Nicol 1921, p.12
- ↑ Nicol 1921, p.20
- ↑ Nicol 1921, p.21
- ↑ Waite 1919, p.40
- ↑ Waite 1919, pp.42–43
- ↑ Powles 1928, p.15
- ↑ Powles 1928, p.17
- ↑ Powles 1928, p.27
- ↑ Powles 1928, p.28
- ↑ Wilkie 1924, p.15
- ↑ Waite 1919, p.135
- ↑ Wilkie 1924, p.17
- ↑ Waite 1919, p.136
- ↑ Powles 1928, p.29
- 1 2 Waite 1919, p.138
- ↑ Nicol 1921, pp.44–45
- ↑ Waite 1919, pp.141–142
- ↑ Waite 1919, p.142
- 1 2 Powles 1928, p.32
- ↑ Powles 1928, p.36
- ↑ Powles 1928, pp.36–37
- 1 2 Nicol 1924, p.27
- 1 2 Powles 1928, p.37
- ↑ Waite 1924, p.28
- ↑ Waite 1924, pp.28–29
- 1 2 Waite 1924, p.29
- ↑ Powles 1928, pp.37–38
- ↑ Waite 1924, pp.31–32
- ↑ Waite 1924, pp.32–33
- ↑ Powles 1928, p.40
- ↑ Powles 1928, p.45
- 1 2 Nicol 1921, p.75
- ↑ Powles 1928, pp.46–48
- ↑ Wilkie 1924, pp.45–46
- ↑ Wilkie 1924, pp.51–55
- ↑ Powles 1928, p.54
- ↑ Waite 1924, p.57
- ↑ Powles 1928, pp.56–57
- ↑ Waite 1919, p.252
- ↑ Powles 1928, p.59
- ↑ Nicol 1921, pp.81–84
- ↑ Wilkie 1924, pp.63–64
- ↑ Waite 1919, p.261
- ↑ Waite 1919, p.266
- ↑ Wilkie 1924, p.68
- ↑ Waite 1919, p.280
- ↑ Powles 1928, pp.71–72
- ↑ Powles 1928, pp.72–75
- ↑ Briscoe Moore 1920, pp.18–19
- ↑ Gullett, p.57
- ↑ Powles 1928, pp.90–91
- ↑ Powles 1928, pp.92–93
- ↑ Powles 1928, p.95
- ↑ Powles 1928, p.103
- Bibliography
- Briscoe Moore, A (1920). The Mounted Riflemen in Sinai And Palestine the Story of New Zealand's Crusaders. Auckland: Whitcombe and Tombs. ISBN 1847343457.
- Fewster, Kevin; Basarin, Vecihi; Basarin, Hatice Hurmuz (2003). Gallipoli: The Turkish Story. Crows Nest, New South Wales: Allen and Unwin. ISBN 1-74114-045-5.
- Gullett, Henry Somer (1923). The Australian Imperial Force in Sinai and Palestine, 1914–1918. Official History of Australia in the War of 1914–1918. Vol. VII. Sydney: Angus and Robertson. OCLC 59863829.
- Kinoch, Terry (2005). Echoes of Gallipoli: In the Words of New Zealand's Mounted Riflemen. Wollombi: Exisle Publishing. ISBN 0908988605.
- Luxford, J H (1923). With the Machine Gunners in France and Palestine. Auckland: Whitcombe and Tombs. ISBN 1843426773.
- Nicol, C.G. (1921). The Story of Two Campaigns: Official War History of the Auckland Mounted Rifles Regiment, 1914–1919. Auckland: Wilson and Horton. ISBN 1847343414.
- Powles, C. Guy; A. Wilkie (1922). The New Zealanders in Sinai and Palestine. Official History New Zealand's Effort in the Great War. Vol. III. Auckland: Whitcombe & Tombs. OCLC 2959465.
- Powles, Charles Guy (1928). The History of the Canterbury Mounted Rifles 1914–1919. Auckland: Whitcombe and Tombs. ISBN 9781847343932.
- Stack, Wayne (2011). The New Zealand Expeditionary Force in World War I. Men-at-arms series. Vol. 473. Oxford: Osprey Publishing. ISBN 1849088888.
- Waite, Fred (1919). The New Zealanders at Gallipoli. Christchurch: Whitcombe and Tombs. ISBN 1407795910.
- Wilkie, A. H. (1924). Official War History of the Wellington Mounted Rifles Regiment, 1914–1919. Auckland: Whitcombe and Tombs. ISBN 9781843427964.
Further reading
- Mackay, Don (2012). The Troopers Tale The History of the Otago Mounted Rifles. Dunedin: Turnbull Ross. ISBN 978-0-473-20462-4.
