The Meyer hardness test is a hardness test based upon projected area of an impression. The hardness, , is defined as the maximum load, divided by the projected area of the indent, .[1]
This is a more fundamental measurement of hardness than other hardness tests which are based on the surface area of an indentation. The principle behind the test is that the mean pressure required to test the material is the measurement of the hardness of the material. Units of megapascals (MPa) are frequently used for reporting Meyer hardness, but any unit of pressure can be used.[2]
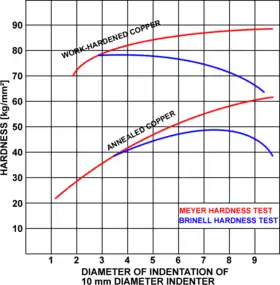
The test was originally defined for spherical indenters, but can be applied to any indenter shape. It is often the definition used in nanoindentation testing.[1] An advantage of the Meyer test is that it is less sensitive to the applied load, especially compared to the Brinell hardness test. For cold worked materials the Meyer hardness is relatively constant and independent of load, whereas for the Brinell hardness test it decreases with higher loads. For annealed materials the Meyer hardness increases continuously with load due to strain hardening.[2]
Based on Meyer's law hardness values from this test can be converted into Brinell hardness values, and vice versa.[3]
The Meyer hardness test was devised by Eugene Meyer of the Materials Testing Laboratory at the Imperial School of Technology, Charlottenburg, Germany, circa 1908.[4][5]
See also
References
- 1 2 Fischer-Cripps, Anthony C. (2011). Nanoindentation (3rd ed.). New York: Springer. ISBN 9781441998729. OCLC 756041216.
- 1 2 Hardness Testing, retrieved 2008-10-07.
- ↑ Tabor, p. 10.
- ↑ E. Meyer, "Untersuchungen über Härteprüfung und Härte Brinell Methoden," Z. Ver. deut. Ing., 52 (1908).
- ↑ V.E. Lysaght, Indentation Hardness Testing, New York: Reinhold Publishing Corp., 1949, p 39-47.
Bibliography
- Tabor, David (2000). The Hardness of Metals. Oxford University Press. ISBN 0-19-850776-3..