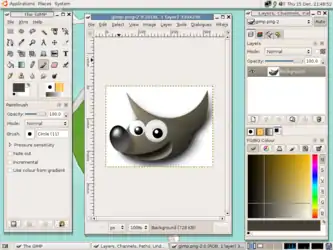
Once you have GIMP installed, run it. For Linux users, this usually means that you will type "gimp-2.*" (* is the current version that is out) in the command line, or look under your Applications > Graphics menu as installation often places an icon for it there. For Windows users, you will most likely have a shortcut on your desktop that will run GIMP.
When you first run the GIMP, you will encounter a configuration screen. Just calmly get your self through it, it's not hard.
Now that you have GIMP up and running, you will no doubt start feeling very, very small. However, this is the way all people react when they start GIMP for the first time. So, to get you more acquainted with the GIMP, here is a tutorial for beginners.
Beginner Tutorial
Open GIMP, and probably you will see three windows called: 'Toolbox', 'Layers patterns' and the main 'Image manipulation' panel, all of which you can drag or rearrange as convenient. From GIMP 2.8.4 there is a Windows menu next to help. There you will find a 'single window mode' which may seem more familiar and friendly (especially if you have many images open at the same time, as it is easier to relate the various windows) but for now, let's start with something simple.
To create a new image (as with most applications) simply click File and select 'new...'. This may be on the window on the left of your screen (called toolbox) in earlier editions or on the main window after GIMP 2.8.4. A pop-up window will appear, asking you how big you want your new image to be. This can be in inches, millimeters or the default pixels(Px) which we will use. Set the width to 400 and the height to 300, then click OK. Go to the image (referred to as the image). On early models click on the menu labelled Dialogues - click on the first option shown. (after 2.8.4 things are more intuitive, but read on - the principle is the same!).
Next, you will click on the option labeled Layers, Paths, Channels, Undo. A window will open. Drag it over to the right edge of your screen. Then do the same thing again, but this time select the option labeled Brushes, Patterns, Pallets, Gradients. Move this to the bottom right of your screen. There, you've set up GIMP. From now on, gimp will start like this when you open it. Anytime you want to close GIMP, simply click on the toolbox's close button or go to <Toolbox>/File/Quit.
Tut 2: Brushes and Colors
Open GIMP (unless you left it open from the last lesson) open a new image (or use the one from the last tutorial). Select the brush tool from the toolbox (the one with the symbol of a brush on it). Then go and select the Brushes tab (the first one) in the Brushes, Patterns... Dialog. click on one of the circular brushes. Now's the time for you to learn how to paint. Keep in mind that unlike other image programs, the brushes in gimp are not resizeable. So once you have your brush set, click on the image and drag your mouse around a little. If you have done everything correctly, there should now be a black scribble on your screen. Next, you will change the color of the lines you paint. Go to the toolbox and double-click on the square that is all black. A window will pop up with a big box on the left and a number of sliders on the right. Click in the middle of the big box and drag your mouse up to the reddest point. Then release your mouse button and click the ok button. Now paint another line. This time the line will be red. Great, you now know how to change the color of the brush you are using.