HELIOMETER (from Gr. ἥλιος, sun, and μέτρον, a measure), an instrument originally designed for measuring the variation of the sun’s diameter at different seasons of the year, but applied now to the modern form of the instrument which is capable of much wider use. The present article also deals with other forms of double-image micrometer.
 | |
| Fig. 1. | Fig. 2. |
The discovery of the method of making measures by double images is stated to have been first suggested by O. Roemer about 1768. But no such suggestion occurs in the Basis Astronomiae of Peter Horrebow (Copenhagen, 1735), which contains the only works of Roemer that remain to us. It would appear that to Servington Savary is due the first invention of a micrometer for measurement by double image. His heliometer (described in a paper communicated to the Royal Society in 1743, and printed, along with a letter from James Short, in Phil. Trans., 1753, p. 156) was constructed by cutting from a complete lens abcd the equal portions aghc and acfe (fig. 1). The segments gbh and efd so formed were then attached to the end of a tube having an internal diameter represented by the dotted circle (fig. 2). The width of each of the portions aghc and acfe cut away from the lens was made slightly greater than the focal length of lens × tangent of sun’s greatest diameter. Thus at the focus two images of the sun were formed nearly in contact as in fig. 3. The small interval between the adjacent limbs was then measured with a wire micrometer.
 |
| Fig. 3. |
 |
| Fig. 4. |
Savary also describes another form of heliometer, on the same principle, in which the segments aghc and acfe are utilized by cementing their edges gh and ef together (fig. 4), and covering all except the portion indicated by the unshaded circle. Savary expresses preference for this second plan, and makes the pertinent remark that in both these models “the rays of red light in the two solar images will be next to each other, which will render the sun’s disk more easy to be observed than the violet ones.” This he mentions “because the glasses in these two sorts are somewhat prismatical, but mostly those of the first model, which could therefore bear no great charge (magnifying power).”
A third model proposed by Savary consists of two complete lenses of equal focal length, mounted in cylinders side by side, and attached to a strong brass plate (fig. 5). Here, in order to fulfil the purposes of the previous models, the distance of the centres of the lenses from each other should only slightly exceed the tangent of sun’s diameter × focal length of lenses. Savary dwells on the difficulty both of procuring lenses sufficiently equal in focus and of accurately adjusting and centring them.
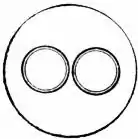 |
| Fig. 5. |
 |
| Fig. 6. |
In the Mém. Acad. de Paris (1748), Pierre Bouguer describes an instrument which he calls a heliometer. Lalande in his Astronomie (vol. ii. p. 639) mentions such a heliometer which had been in his possession from the year 1753, and of which he gives a representation on Plate XXVIII., fig. 186, of the same volume. Bouguer’s heliometer was in fact similar to that of Savary’s third model, with the important difference that, instead of both object-glasses being fixed, one of them is movable by a screw provided with a divided head. No auxiliary filar micrometer was required, as in Savary’s heliometer, to measure the interval between the limbs of two adjacent images of the sun, it being only necessary to turn the screw with the divided head to change the distance between the object-glasses till the two images of the sun are in contact as in fig. 6. The differences of the readings of the screw, when converted into arc, afford the means of measuring the variations of the sun’s apparent diameter.
On the 4th of April 1754 John Dollond communicated a paper to the Royal Society of London (Phil. Trans., vol. xlviii. p. 551) in which he shows that a micrometer can be much more easily constructed by dividing a single object-glass through its axis than by the employment of two object-glasses. He points out—(1) that a telescope with an object-glass so divided still produces a single image of any object to which it may be directed, provided that the optical centres of the segments are in coincidence (i.e. provided the segments retain the same relative positions to each other as before the glass was cut); (2) that if the segments are separated in any direction two images of the object viewed will be produced; (3) that the most convenient direction of separation for micrometric purposes is to slide these straight edges one along the other as the figure on the margin (fig. 7) represents them: “for thus they may be moved without suffering any false light to come in between them; and by this way of removing them the distance between their centres may be very conveniently measured, viz. by having a vernier’s division fixed to the brass work that holds one segment, so as to slide along a scale on the plate to which the other part of the glass is fitted.”
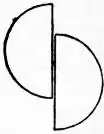 |
| Fig. 7. |
Dollond then points out three different types in which a glass so divided and mounted may be used as a micrometer:—
“1. It may be fixed at the end of a tube, of a suitable length to its focal distance, as an object-glass,—the other end of the tube having an eye-glass fitted as usual in astronomical telescopes.
“2. It may be applied to the end of a tube much shorter than its focal distance, by having another convex glass within the tube, to shorten the focal distance of that which is cut in two.
“3. It may be applied to the open end of a reflecting telescope, either of the Newtonian or the Cassegrain construction.”
Dollond adds his opinion that the third type is “much the best and most convenient of the three”; yet it is the first type that has survived the test of time and experience, and which is in fact the modern heliometer. It must be remembered, however, that when Dollond expressed preference for this third type he had not then invented the achromatic object-glass.
Some excellent instruments of the second type were subsequently made by Dollond’s eldest son Peter, in which for the “convex glass within the tube” was substituted an achromatic object-glass, and outside that a divided negative achromatic combination of long focus. In the fine example of this instrument at the Cape Observatory the movable negative lenses consist of segments of the shape gach and acfe (fig. 1) cut from a complete negative achromatic combination of 814 in. aperture and about 41 ft. focal length, composed of a double concave flint lens and a double convex crown. This was applied to an excellent achromatic telescope of 314 in. aperture and 42 in. focal length. In this instrument a considerable linear relative movement of the divided lens corresponds with a comparatively small separation of the double image, so that simple verniers reading to 11000 in. are sufficient for measurement.
With one of these instruments of somewhat smaller dimensions (telescope 212 in. aperture and 312 ft. focus), Franz von Paula Triesnecker made a series of measurements at the observatory of Vienna which has been reduced by Dr Wilhelm Schur of Strasburg (Nova Acta der Ksl. Leop.-Carol. Deutschen Akademie der Natursforscher, 1882, xlv. No. 3). The angle between the stars ζ and g Ursae maj. (708″.55) was measured on four nights; the probable error of a measure on one night was ±0″.44. Jupiter was measured on eleven nights in the months of June and July 1794; from these measures Schur derives the values 35″.39 and 37″.94 for the polar and equatorial diameter respectively, at mean distance, corresponding with a compression 1/14.44. These agree satisfactorily with the corresponding values 35″.21, 37″.60, 1/15.59 afterwards obtained by F. W. Bessel (Königsberger Beobachtungen, xix. 102). From a series of measures of the angle between Jupiter’s satellites and the planet, made in June and July 1794 and in August and September 1795, Schur finds the mass of Jupiter = 1/1048.55 ± 1.45, a result which accords well within the limits of its probable error with the received value of the mass derived from modern researches. The probable errors for the measures of one night are ±0″.577, ±0″.889, ±0″.542, ±1″.096, for Satellites I., II., III. and IV. respectively.
Considering the accuracy of these measures (an accuracy far surpassing that of any other contemporary observations), it is somewhat surprising that this form of micrometer was never systematically used in any sustained or important astronomical researches, although a number of instruments of the kind were made by Dollond. Probably the last example of its employment is an observation of the transit of Mercury (November 4, 1868) by Mann, at the Royal Observatory, Cape of Good Hope (Monthly Notices R.A.S. vol. xxix. p. 197-209). The most important part, however, which this type of instrument seems to have played in the history of astronomy arises from the fact that one of them was in the possession of Bessel at Königsberg during the time when his new observatory there was being built. In 1812 Bessel measured with it the angle between the components of the double star 61 Cygni and observed the great comet of 1811. He also observed the eclipse of the sun on May 4, 1818. In the discussion of these observations (Königsberger Beobacht, Abt. 5, p. iv.) he found that the index error of the scale changed systematically in different position angles by quantities which were independent of the direction of gravity relative to the position angle under measurement, but which depended solely on the direction of the measured position angle relative to a fixed radius of the object-glass. Bessel attributed this to non-homogeneity in the object-glass, and determined with great care the necessary corrections. But he was so delighted with the general performance of the instrument, with the sharpness of the images and the possibilities which a kindred construction offered for the measurement of considerable angles with micrometric accuracy, that he resolved, when he should have the choice of a new telescope for the observatory, to secure some form of heliometer.
Nor is it difficult to imagine the probable course of reasoning which led Bessel to select the model of his new heliometer. Why, he might ask, should he not select the simple form of Dollond’s first type? Given the achromatic object-glass, why should not it be divided? This construction would give all the advantage of the younger Dollond’s object-glass micrometer, and more than its sharpness of definition, without liability to the systematic errors which may be due to want of homogeneity of the object-glass; for the lenses will not be turned with respect to each other, but, in measurement, will always have the same relation in position angle to the line joining the objects under observation. It is true that the scale will require to be capable of being read with much greater accuracy than 11000th of an inch—for that, even in a telescope of 10 ft. focus, would correspond with 2″ of arc. But, after all, this is no practical difficulty, for screws can be used to separate the lenses, and, by these screws, as in a Gascoigne micrometer, the separation of the lenses can be measured; or we can have scales for this purpose, read by microscopes, like the Troughton[1] circles of Piazzi or Pond, or those of the Carey circle, with almost any required accuracy.
Whether Bessel communicated such a course of reasoning to Fraunhofer, or whether that great artist arrived independently at like conclusions, we have been unable to ascertain with certainty. The fact remains that before 1820[2] Fraunhofer had completed one or more of the five heliometers (3 in. aperture and 39 in. focus) which have since become historical instruments. In 1824 the great Königsberg heliometer was commenced, and it was completed in 1829.
To sum up briefly the history of the development of the heliometer. The first application of the divided object-glass and the employment of double images in astronomical measures is due to Savary in 1743. To Bouguer in 1748 is due the true conception of measurement by double image without the auxiliary aid of a filar micrometer, viz. by changing the distance between two object-glasses of equal focus. To Dollond in 1754 we owe the combination of Savary’s idea of the divided object-glass with Bouguer’s method of measurement, and the construction of the first really practical heliometers. To Fraunhofer, some time not long previous to 1820, is due, so far as we can ascertain, the construction of the first heliometer with an achromatic divided object-glass, i.e. the first heliometer of the modern type.
 |
| Fig. 8. |
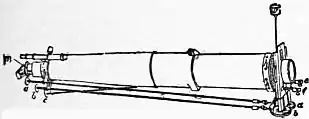
The Königsberg heliometer is represented in fig. 8. No part of the equatorial mounting is shown in the figure, as it resembles in every respect the usual Fraunhofer mounting. An adapter h is fixed on a telescope-tube, made of wood, in Fraunhofer’s usual fashion. To this adapter is attached a flat circular flange h. The slides carrying the segments of the divided object-glass are mounted on a plate, which is fitted and ground to rotate smoothly on the flange h. Rotation is communicated by a pinion, turned by the handle c (concealed in the figure), which works in teeth cut on the edge of the flange h. The counterpoise w balances the head about its axis of rotation. The slides are moved by the screws a and b, the divided heads of which serve to measure the separation of the segments. These screws are turned from the eye-end by bevelled wheels and pinions, the latter connected with the handles a′, b′. The reading micrometers e, f also serve to measure, independently, the separation of the segments, by scales attached to the slides; such measurements can be employed as a check on those made by the screws. The measurement of position angles is provided for by a graduated circle attached to the head. There is also a position circle, attached at m to the eye-end, provided with a slide to move the eye-piece radially from the axis of the telescope, and with a micrometer to measure the distance of an object from that axis. The ring c, which carries the supports of the handles a′, b′, is capable of a certain amount of rotation on the tube. The weight of the handles and their supports is balanced by the counterpoise z. This ring is necessary in order to allow the rods to follow the micrometer heads when the position angle is changed. Complete rotation of the head is obviously impossible because of the interference of the declination axis with the rods, and therefore, in some angles, objects cannot be measured in two positions of the circle. The object-glass has an aperture of 612 in. and 102 in. focal length.
There are three methods in which this heliometer can be used.
First Method.—One of the segments is fixed in the axis of the telescope, and the eye-piece is also placed in the axis. Measures are made with the moving segment displaced alternately on opposite sides of the fixed segment.
Second Method.—One segment is fixed, and the measures are made as in the first method, excepting that the eye-piece is placed symmetrically with respect to the images under measurement. For this purpose the position angle of the eye-piece micrometer is set to that of the head, and the eye-piece is displaced from the axis of the tube (in the direction of the movable segment) by an amount equal to half the angle under measurement.
Third Method.—The eye-piece is fixed in the axis, and the segments are symmetrically displaced from the axis each by an amount equal to half the angle measured.
Of these methods Bessel generally employed the first because of its simplicity, notwithstanding that it involved a resetting of the right ascension and declination of the axis of the tube with each reversal of the segments. The chief objections to the method are that, as one star is in the axis of the telescope and the other displaced from it, the images are not both in focus of the eye-piece,[3] and the rays from the two stars do not make the same angle with the optical axis of each segment. Thus the two images under measurement are not defined with equal sharpness and symmetry. The second method is free from the objection of non-coincidence in focus of the images, but is more troublesome in practice from the necessity for frequent readjustment of the position of the eye-piece. The third method is the most symmetrical of all, both in observation and reduction; but it was not employed by Bessel, on the ground that it involved the determination of the errors of two screws instead of one. On the other hand it is not necessary to reset the telescope after each reversal of the segments.[4]
When Bessel ordered the Königsberg heliometer, he was anxious to have the segments made to move in cylindrical slides, of which the radius should be equal to the focal length of the object-glass. Fraunhofer, however, did not execute this wish, on the ground that the mechanical difficulties were too great.
M. L. G. Wichmann states (Königsb. Beobach. xxx. 4) that Bessel had indicated, by notes in his handbooks, the following points which should be kept in mind in the construction of future heliometers: (1) The segments should move in cylindrical slides;[5] (2) the screw should be protected from dust;[6] (3) the zero of the position circle should not be so liable to change;[7] (4) the distance of the optical centres of the segments should not change in different position angles or otherwise;[8] (5) the points of the micrometer screws should rest on ivory plates;[9] (6) there should be an apparatus for changing the screen.[10]
Wilhelm Struve, in describing the Pulkowa heliometer,[11] made by Merz in 1839 on the model of Bessel’s heliometer, submits the following suggestions for its improvement:[12] (1) to give automatically to the two segments simultaneous equal and opposite movement;[13] and (2) to make the tube of metal instead of wood; to attach the heliometer head firmly to this tube; to place the eye-piece permanently in the axis of the telescope; and to fix a strong cradle on the end of the declination axis, in which the tube, with the attached head and eye-piece, could rotate on its axis.
Both suggestions are important. The first is originally the idea of Dollond; its advantages were overlooked by his son, and it seems to have been quite forgotten till resuggested by Struve. But the method is not available if the separation is to be measured by screws; it is found, in that case, that the direction of the final motion of turning of the screw must always be such as to produce motion of the segment against gravity, otherwise the “loss of time” is apt to be variable. Thus the simple connexion of the two screws by cog-wheels to give them automatic opposite motion is not an available method unless the separation of the segments is independently measured by scales.
Struve’s second suggestion has been adopted in nearly all succeeding heliometers. It permits complete rotation of the tube and measurement of all angles in reversed positions of the circle; the handles that move the slides can be brought down to the eye-end, inside the tube, and consequently made to rotate with it; and the position circle may be placed at the end of the cradle next the eye-end where it is convenient of access. Struve also points out that by attaching a fine scale to the focusing slide of the eye-piece, and knowing the coefficient of expansion of the metal tube, the means would be provided for determining the absolute change of the focal length of the object-glass at any time by the simple process of focusing on a double star. This, with a knowledge of the temperature of the screw or scale and its coefficient of expansion, would enable the change of screw-value to be determined at any instant.
It is probable that the Bonn heliometer was in course of construction before these suggestions of Struve were published or discussed, since its construction resembles that of the Königsberg and Pulkowa instruments. Its dimensions are similar to those of the former instrument. Bessel, having been consulted by the celebrated statesman, Sir Robert Peel, on behalf of the Radcliffe trustees, as to what instrument, added to the Radcliffe Observatory, would probably most promote the advancement of astronomy, strongly advised the selection of a heliometer. The order for the instrument was given to the Repsolds in 1840, but “various circumstances, for which the makers are not responsible, contributed to delay the completion of the instrument, which was not delivered before the winter of 1848.”[14] The building to receive it was commenced in March 1849 and completed in the end of the same year. This instrument has a superb object-glass of 712 in. aperture and 126 in. focal length. The makers availed themselves of Bessel’s suggestion to make the segments move in cylindrical slides, and of Struve’s to have the head attached to a brass tube; the eye-piece is set permanently in the axis, and the whole rotates in a cradle attached to the declination axis. They provided a splendid, rigidly mounted, equatorial stand, fitted with every luxury in the way of slow motion, and scales for measuring the displacement of the segments were read by powerful micrometers from the eye-end.[15] It is somewhat curious that, though Struve’s second suggestion was adopted, his first was overlooked by the makers. But it is still more curious that it was not afterwards carried out, for the communication of automatic symmetrical motion to both segments only involves a simple alteration previously described. But, as it came from the hands of the makers in 1849, the Oxford heliometer was incomparably the most powerful and perfect instrument in the world for the highest order of micrometric research. It so remained, unrivalled in every respect, till 1873.
As the transit of Venus of 1874 approached, preparations were set on foot by the German Government in good time; a commission of the most celebrated astronomers was appointed, and it was resolved that the heliometer should be the instrument chiefly relied on. The four long-neglected small heliometers made by Fraunhofer were brought into requisition. Fundamental alterations were made upon them: their wooden tubes were replaced by tubes of metal; means of measuring the focal point were provided; symmetrical motion was given to the slides; scales on each slide were provided instead of screws for measuring the separation of the segments, and both scales were read by the same micrometer microscope; a metallic thermometer was added to determine the temperature of the scales. These small instruments have since done admirable work in the hands of Schur, Hartwig, Küstner, Elkin, Auwers and others.
 |
| Fig. 9. |
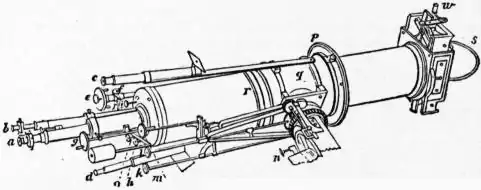
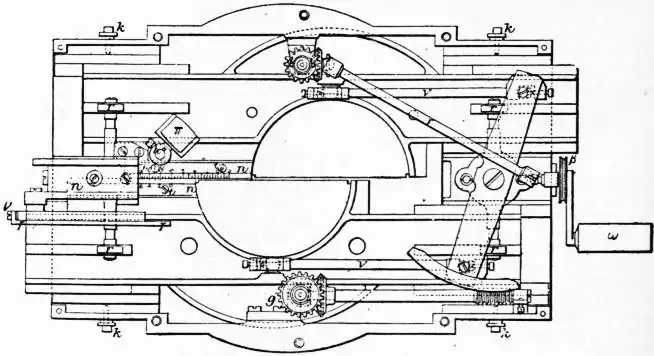
The Russian Government ordered three new heliometers (each of 4 in. aperture and 5 ft. focal length) from the Repsolds, and the design for their construction was superintended by Struve, Auwers and Winnecke, the last-named making the necessary experiments at Carlsruhe. Fig. 9 represents the resulting type of instrument which was finally designed and constructed by Repsolds. The brass tube, strengthened at the bearing points by strong truly turned collars, rotates in the cast iron cradle q attached to the declination axis, a is the eye-piece fixed in the optical axis, b the micrometer for reading both scales, c and d are telescopes for reading the position circle p, e the handle for quick motion in position angle, f the slow motion in position angle, g the handle for changing the separation of the segments by acting on the bevel-wheel g′ (fig. 10). h is a milled head connected by a rod with h′ (fig. 10), for the purpose of interposing at pleasure the prism π in the axis of the reading micrometer; this enables the observer to view the graduations on the face of the metallic thermometer ττ (composed of a rod of brass and a rod of zinc), i is a milled head connected with the wheel i′i′ (fig. 10), and affords the means of placing the screen s (fig. 9), counterpoised by w over either half of the object-glass. k clamps the telescope in declination, n clamps it in right ascension, and the handles m and l provide slow motion in declination and right ascension respectively.
 |
| Fig. 10. |
The details of the interior mechanism of the “head” will be almost evident from fig. 10 without description. The screw, turned by the wheels at g′, acts in a toothed arc, whence, as shown in the figure, equal and opposite motion is communicated to the slides by the jointed rods v, v. The slides are kept firmly down to their bearings by the rollers r, r, r, r, attached to axes which are, in the middle, very strong springs. Side-shake is prevented by the screws and pieces k, k, k, k. The scales are at n, n; they are fastened only at the middle, and are kept down by the brass pieces t, t.
A similar heliometer was made by the Repsolds to the order of Lord Lindsay for his Mauritius expedition in 1874. It differed only from the three Russian instruments in having a mounting by the Cookes in which the declination circle reads from the eye-end.[16] This instrument was afterwards most generously lent by Lord Lindsay to Gill for his expedition to Ascension in 1877.[17]
These four Repsold heliometers proved to be excellent instruments, easy and convenient in use, and yielding results of very high accuracy in measuring distances. Their slow motion in position angle, however, was not all that could be desired. When small movements were communicated to the handle e (fig. 9) by the tangent screw f, acting on a small toothed wheel clamped to the rod connected with the driving pinion, there was apt to be a torsion of the rod rather than an immediate action. Thus the slow motion would take place by jerks instead of with the necessary smoothness and certainty. When the heliometer-part of Lord Lindsay’s heliometer was acquired by Gill in 1879, he changed the manner of imparting the motion in question. A square toothed racked wheel was applied to the tube at r (fig. 9). This wheel is acted on by a tangent screw whose bearings are attached to the cradle; the screw is turned by means of a handle supported by bearings attached to the cradle, and coming within convenient reach of the observer’s hand. The tube turns smoothly in the racked wheel, or can be clamped to it at the will of the observer. This alteration and the new equatorial mounting have been admirably made by Grubb; the result is completely successful. The instrument so altered was in use at the Cape Observatory from March 1881 till 1887 in determining the parallax of some of the more interesting southern stars. The instrument then passed, by purchase from Gill, to Lord McLaren, by whom it was presented to the Royal Observatory, Edinburgh.
 |
| Fig. 11. |
 |  |
| Fig. 12. | Fig. 13. |
 |
| Fig. 14. |
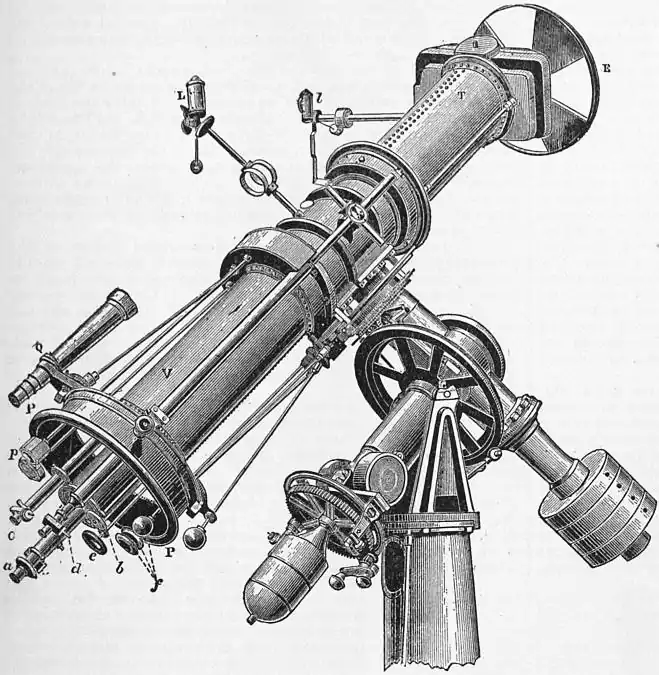
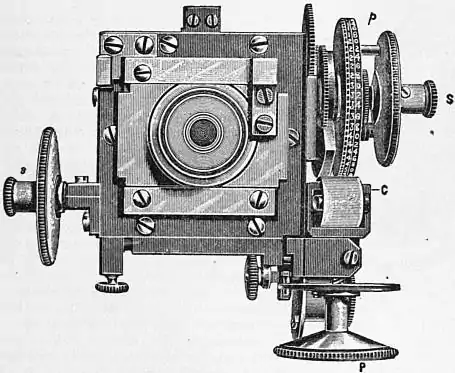
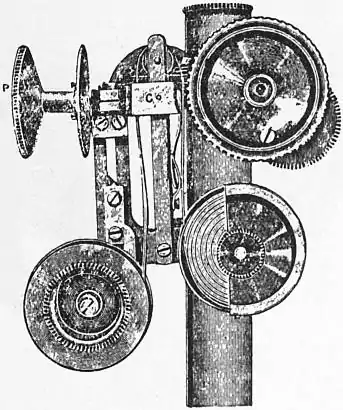
Still more recently the Repsolds have completed a new heliometer for Yale College, New Haven, United States. The object-glass is of 6 in. aperture and 98 in. focal length. The mounting, the tube, objective-cell, slides, &c., are all of steel.[18] The instrument is shown in fig. 11. The circles for position angle and declination are read by micrometer-microscopes illuminated by the lamp L; the scales are illuminated by the lamp l. T is part of the tube proper, and turns with the head. The tube V, on the contrary, is attached to the cradle, and merely forms a support for the finder Q, the handles at f and p, and the moving ring P. The latter gives quick motion in position angle; the handles at p clamp and give slow motion in position angle, those at f clamp and give slow motion in right ascension and declination. a is the eye-piece, b the handle for moving the segments, c the micrometer microscope for reading the scales and scale micrometer, d the micrometer readers of the position and declination circles, e the handle for rotating the large wheel E which carries the screens. The hour circle is also read by microscopes, and the instrument can be used in both positions (tube preceding and following) for elimination of the effect of flexure on the position angles. Elkin found that the chief drawbacks to speed and convenience in working this heliometer were: (1) The loss of time involved in entering the corresponding readings of the micrometer pointings on two scales. (2) That an additional motion intermediate between the quick and slow motion in position angle was necessary, because, whilst the slow motion provided by Repsolds was admirably adapted for adjusting the pointings in position angle, it was too slow for causing the images to “cross through” each other in the process of measuring distances. To remedy drawback (1) Repsolds devised the form of printing micrometer which is shown in figs. 12 and 13. This micrometer is provided with two pairs of parallel webs. One fixed pair of webs is attached to the micrometer-box, the other pair is moved by the screw S. The whole micrometer-box is moved by the screw attached to the heads. Accordingly, in reading the scales A and B (attached to the slides which carry the two halves of the object-glass), it is only necessary to turn the screws until the fixed double web is pointed symmetrically on one of the divisions of scale A, then to move the other double web by the screw S until it is symmetrically pointed on the adjoining division of scale B. By turning the quick acting screw P (fig. 13) to the right, the cushion C (which is faced with india-rubber) presses the paper ribbon (shown in fig. 13) against the index-edge and type-wheels, and thus the beautifully cut divisions of the micrometer-head, the numbers marking the 1100 parts of the head, the index and the total number of revolutions are all sharply embossed together upon the paper ribbon. Fig. 14 shows the record of several successive paintings on the same scale as that given by the micrometer. The reverse motion of P automatically moves the paper ribbon forward, ready to receive the next impression. It must be mentioned that the pressure of the cushion C on the type-wheels has no influence whatever upon the micrometer-screw, because the type-wheels are mounted on a hollow cylindrical axis, concentric with the axis of the screw, but entirely disconnected from the screw itself. The only connexion between the type-wheel and the screw-head S is by the pin p (which is screwed into S), the cylindrical end of which acts in a slot cut in the type-wheel. To remedy drawback (2) Repsolds provided for the Yale heliometer an additional handle for motion in position angle, intermediate in velocity between the original quick and slow motions.
 |
| From Engineering, vol. xlix.Fig. 15. |
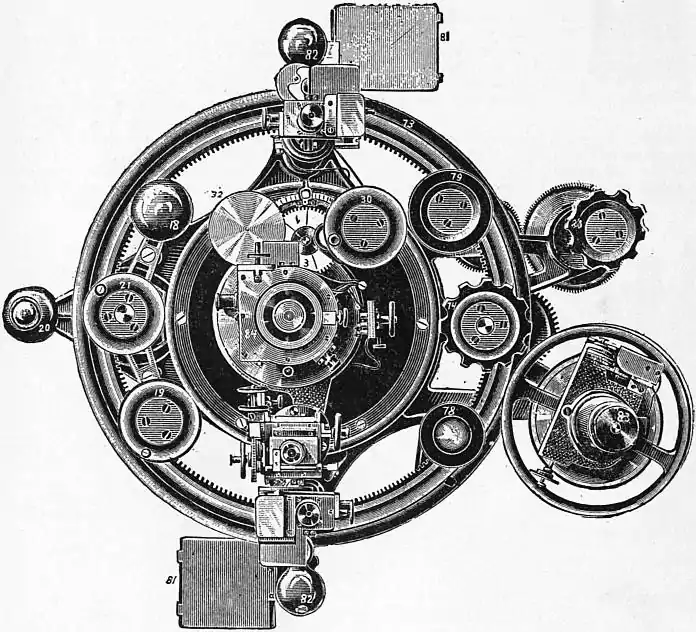
In the 7-in. heliometer, completed in 1887 for the Royal Observatory at the Cape of Good Hope, Repsolds, on Gill’s suggestion, introduced the following improvements: (a) Four different speeds of motion in position angle were provided. The quickest movement is given by the hand-ring, 73 (fig. 15). This ring runs between friction wheels and is provided with teeth on its inner periphery, and these teeth transmit motion to a pinion on a spindle having at its other end another pinion which, through an intermediate wheel, rotates the heliometer tube. The transmission spindle, just mentioned, carries at its end a head, 74, which, if turned directly, gives the second speed. The slowest speed is given by means of a tangent screw which is carried by a ball-bearing on the flange of the telescope-sleeve, whilst its nut is double-jointed to a ring that encircles the flange of the heliometer-tube. This ring is provided with a clamping screw, which, through the intervention of bevel-gear and rods, is operated by means of the hand-wheel 78. With similar bevel-gear and rods the tangent screw is connected to the hand-wheel, 79, by which the observer communicates the fourth or slowest motion in position angle. Finally the hand-wheel 80 is connected by gearing to the rod carrying the hand-wheel 79, and it can thus be used to give the latter a more rapid motion than if used direct; this constitutes the third speed of movement.
(b) In lieu of oil-lamps, small, conveniently placed incandescent electric 6-volt lamps are employed; and these are fitted with suitable switches and variable resistances. Thus the scales, the position- and declination-circles, the field of view, the heads of all the micrometer-microscopes, the focusing scale, &c., are read without the aid of a hand-lamp and with an amount of illumination that can be regulated at the observer’s pleasure.
(c) A button in the centre of the position-angle handle (74) connects with a chronograph which enables the observer to record the instant of observation. Little card-holders (81) (also illuminated) enable the astronomer to enter beforehand the R.A. and Dec. of the object to be observed, the scale divisions to be pointed upon, and thus, in measures of distance, with the aid of the chronograph and printing micrometer, enable the observer to adjust the instrument for observation and obtain a record of his observations without the aid of a hand-lamp or the necessity to make any records in his notebook. In observations of position angle one of the two tablets 81 can be used to record the readings.
(d) The scales are made of iridio-platinum instead of silver, and the magnifying power of the reading microscope is increased fourfold (viz. to 100 diameters). A special microscope is introduced for determining the division errors of the scales. It enables the observer to compare any division-interval on one half of either scale with any corresponding interval on the other scale. With this apparatus Gill was enabled (Annals Cape Obs. vii. 29-42, and Monthly Notices, R.A.S., xlix. 105–115) to determine the division error of every line on both scales with a probable error corresponding to ± 0″.0092 arc.
(e) A position-micrometer is attached to the finder to enable the observer to select comparison stars for observation with some unexpected object. Thus a comet may be encountered in the morning dawn or evening twilight, and without such an adjunct the astronomer may lose the whole available opportunity for observation in the vain endeavour to find a suitable comparison-star. But with such a position-micrometer of large field he has no difficulty. Directing the finder to the comet, he has at once in the field of view all available comparison stars. Having selected the most suitable one he directs the axis of the finder to the estimated middle point between the comet and the star, turns the finder-micrometer in position angle until the images of comet and star lie symmetrically between the parallel position wires, and then turns the micrometer screw (which moves the distance-wires symmetrically from the centre in opposite directions) till one wire bisects the comet and the other the star. The reading of the position-circle of the finder is then the reading to which the position-circle of the heliometer should be set, and from the readings of the micrometer-screw he finds, by a convenient table, the proper settings of the heliometer scales in distance. When the scales and position-circle of the heliometer have been set to these readings, the comet and the selected comparison-star appear together in the field of view.
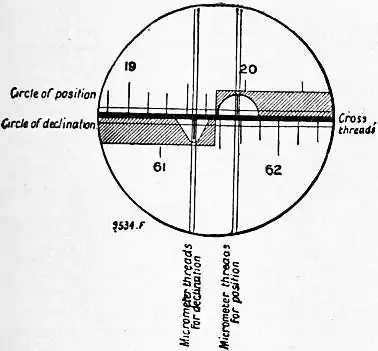
Fig. 15 shows the very convenient arrangement of the eye-end of the instrument. The disk, 30 with its small projecting handle enables the 2 segments of the divided object to be moved rapidly or with any required delicacy relative to each other. The disk 32 operates the wire gauze screens for equalizing the brightness of the two stars under observation. The dial between 30 and 32 indicates the screen in use. 18 clamps and 19 gives slow motion in declination; 20 clamps and 21 gives slow motion in right ascension. The two handles 82 serve for manipulating the instrument. The microscopes adjoining 82 read the position and declination circles; for, by an ingenious arrangement of prisms and screens, the images of both circles can be read by each single microscope as shown in fig. 16, thus avoiding the necessity for the employment of two additional micrometers.
Experience has shown that there is little that can be advantageously changed to improve this instrument either in convenience or precision of working. A series of observations can be easily and more accurately accomplished with the Cape heliometer in half an hour; with the Oxford heliometer it would occupy 2 hours, and with the 4 in. Repsold heliometer (fig. 9) 1 hour. Heliometers of 6 to 8 in. aperture have subsequently been constructed by Repsolds on these plans for Göttingen, Bamberg, Leipzig and the Kuffner Observatory (near Vienna), and all of them have made important contributions to astronomy of precision.
 |
| From Engineering, vol. xlix. |
| Fig. 16. |
Heliometer observations of distance in their most refined sense cannot be considered absolute measures of angles. Essentially the scale-value of the instrument depends on the relation of the focal length of the object-glass to the length of the unit of the scale. But the eye is tolerant of small changes in the focal adjustment which sensibly affect the scale-value. These changes may and do arise from the following causes: (i.) The focal length of the object-glass and the length of the tube are affected by temperature. (ii.) The focal length is sensibly different for objects of different colour. (iii.) The length of the scale is affected by temperature. (iv.) The state of adaptation of the observer’s eye is dependent on his state of health, on a condition of greater or less fatigue, or on the inclination of the head in consequence of the altitude of the object observed. (v.) The temperature of the object-glass, of the scale and of the tube, cannot be assumed to be identical.
Thus, for refined purposes, it cannot be assumed with any certainty that the instantaneous scale-value of the heliometer is known, or that it is a function of the temperature. Of course, for many purposes, mean conditions may be adopted and mean scale-values be found which are applicable with considerable precision to small angles or to comparatively crude observations of large distances; but the highest refinement is lost unless means are provided for determining the scale-value for each observer at each epoch of observation.
In determinations of stellar or solar parallax, comparison stars, symmetrically situated with respect to the object whose parallax is sought, should be employed, in which case the instantaneous scale-value may be regarded as an unknown quantity which can be derived in the process of the computation of the results. Examples of this mode of procedure will be found, in the case of stellar parallax in the Mem. R.A.S. vol. xlviii. pp. 1-194, and in the Annals of the Cape Observatory, vol. viii. parts 1 and 2; and in the case of planetary parallax in the Mem. R.A.S. vol. xlvi. pp. 1-171, and in the Annals of the Cape Observatory, vol. vi. In other operations, such as the triangulation of large groups of stars, it is necessary to select a pair of standard stars, if possible near the middle of the group, and to determine the scale-value by measures of this standard distance at frequent intervals during the night (see Annals of the Cape Observatory, vol. vi. pp. 3-224). In other cases, such as the measurement of the mutual distances and position angles of the satellites of Jupiter, for derivation of the elements of the orbits of the satellites and the mass of Jupiter, reference must also be made to measures of standard stars whose relative distance and position angle is accurately determined by independent methods (see Annals of the Cape Observatory, vol. xii. part 2).
 |
| Fig. 17. |
Gill introduced a powerful auxiliary to the accuracy of heliometer measures in the shape of a reversing prism placed in front of the eye-piece, between the latter and the observer’s eye. If measures are made by placing the image of a star in the centre of the disk of a planet, the observer may have a tendency to do so systematically in error from some acquired habit or from natural astigmatism of the eye. But by rotating the prism 90° the image is presented entirely reversed to the eye, so that in the mean of measures made in two such positions personal error is eliminated. Similarly the prism may be used for the study and elimination of personal errors depending on the angle made by a double star with the vertical. The best plan of mounting such a prism has been found to be the following. l1, l2 (fig. 17) are the eye lens and field lens respectively of a Merz positive eye-piece. In this construction the lenses are much closer together and the diaphragm for the eye is much farther from the lenses than in Ramsden’s eye-piece. The prism p is fitted accurately into brass slides (care has to be taken in the construction to place the prism so that an object in the centre of the field will so remain when the eye-piece is rotated in its adapter). There is a collar, clamped by the screw at S, which is so adjusted that the eye-piece is in focus when pushed home, in its adapter, to this collar. The prism and eye-piece are then rotated together in the adapter.
The Double Image Micrometer.—Thomas Clausen in 1841 (Ast. Nach. No. 414) proposed a form of micrometer consisting of a divided plate of parallel glass placed within the cone of rays from the object-glass at right angles to the telescope axis. One-half of this plane remains fixed, the other half is movable. When the inclination of the movable half with respect to the axis of the telescope is changed by rotation about an axis at right angles to the plane of division, two images are produced. The amount of separation is very small, and depends on the thickness of the glass, the index of refraction and the focal length of the telescope. Angelo Secchi (Comptes rendus, xli., 1855, p. 906) gives an account of some experiments with a similar micrometer; and Ignarjio Porro (Comptes rendus, xli. p. 1058) claims the original invention and construction of such a micrometer in 1842. Clausen, however, has undoubted priority. Helmholtz in his “Ophthalmometer” has employed Clausen’s principle, but arranges the plates so that both move symmetrically in opposite directions with respect to the telescope axis. Should Clausen’s micrometer be employed as an astronomical instrument, it would be well to adopt the improvement of Helmholtz.
Double-Image Micrometers with Divided Lenses.—Various micrometers have been invented besides the heliometer for measuring by double image. Ramsden’s dioptric micrometer consists of a divided lens placed in the conjugate focus of the innermost lens of the erecting eye-tube of a terrestrial telescope. The inventor claimed that it would supersede the heliometer, but it has never done anything for astronomy. Dollond claims the independent invention and first construction of a similar instrument (Pearson’s Practical Astronomy, ii. 182). Of these and kindred instruments only two types have proved of practical value. G. B. Amici of Modena (Mem. Soc. Ital. xvii., 1815, pp. 344–359) describes a micrometer in which a negative lens is introduced between the eye-piece and the object-glass. This lens is divided and mounted like a heliometer object-glass; the separation of the lenses produces the required double image, and is measured by a screw. W. R. Dawes very successfully used this micrometer in conjunction with a filar micrometer, and found that the precision of the measures was in this way greatly increased (Monthly Notices, vol. xviii. p. 58, and Mem. R.A.S. vol. xxxv. p. 147).
In the improved form[19] of Airy’s divided eye-glass micrometer (Mem. R.A.S. vol. xv. pp. 199–209) the rays from the object-glass pass successively through lenses as follows:
| Lens. | Distance from next Lens. | Focal Length. |
| a. An equiconvex lens | p | arbitrary = p |
| b. ” ” | 2 | 5 |
| c. Plano-convex, convex towards b | 134 | 1 |
| d. Plano-convex, convex towards c | ” | 1 |
The lens b is divided, and one of the segments is moved by a micrometer screw. The magnifying power is varied by changing the lens a for another in which p has a different value. The magnifying power of the eye-piece is that of a single lens of focus = 45p.
In 1850 J. B. Valz pointed out that the other optical conditions could be equally satisfied if the divided lens were made concave instead of convex, with the advantage of giving a larger field of view (Monthly Notices, vol. x. p. 160).
The last improvement on this instrument is mentioned in the Report of the R.A.S. council, February 1865. It consists in the introduction by Simms of a fifth lens, but no satisfactory description has ever appeared. There is only one practical published investigation of Airy’s micrometer that is worthy of mention, viz. that of F. Kaiser (Annalen der Sternwarte in Leiden, iii. 111–274). The reader is referred to that paper for an exhaustive history and discussion of the instrument.[20] It is somewhat surprising that, after Kaiser’s investigations, observers should continue, as many have done, to discuss their observations with this instrument as if the screw-value were constant for all angles.
Steinheil (Journal savant de Munich, Feb. 28, 1843) describes a “heliomètre-oculaire” which he made for the great Pulkowa refractor, the result of consultations between himself and the elder Struve. It is essentially the same in principle as Amici’s micrometer, except that the divided lens is an achromatic positive instead of a negative lens. Struve (Description de l’Observatoire Central de Pulkowa, pp. 196, 197) adds a few remarks to Steinheil’s description, in which he states that the images have not all desirable precision—a fault perhaps inevitable in all micrometers with divided lenses, and which is probably in this case aggravated by the fact that the rays falling upon the divided lens have considerable convergence. He, however, successfully employed the instrument in measuring double stars, so close as 1″ or 2″, and using a power of 300 diameters, with results that agreed satisfactorily amongst themselves and with those obtained with the filar micrometer. If Struve had employed a properly proportioned double circular diaphragm, fixed symmetrically with the axis of the telescope in front of the divided lens and turning with the micrometer, it is probable that his report on the instrument would have been still more favourable. This particular instrument has historical interest, having led Struve to some of those criticisms of the Pulkowa heliometer which ultimately bore such valuable fruit (see ante).
Ramsden (Phil. Trans. vol. xix. p. 419) suggested the division of the small speculum of a Cassegrain telescope and the production of double image by micrometric rotation of the semispecula in the plane passing through their axis. Brewster (Ency. Brit. 8th ed. vol. xiv. p. 749) proposed a plan on a like principle, by dividing the plane mirror of a Newtonian telescope. Again, in an ocular heliometer by Steinheil double image is similarly produced by a divided prism of total reflection placed in parallel rays. But practically these last three methods are failures. In the last the field is full of false light, and it is not possible to give sufficiently minute and steady separation to the images; and there are of necessity a collimator, two prisms of total reflection, and a small telescope through which the rays must pass; consequently there is great loss of light.
Micrometers Depending on Double Refraction.—To the Abbé Rochon (Jour. de phys. liii., 1801, pp. 169–198) is due the happy idea of applying the two images formed by double refraction to the construction of a micrometer. He fell upon a most ingenious plan of doubling the amount of double refraction of a prism by using two prisms of rock-crystal, so cut out of the solid as to give each the same quantity of double refraction, and yet to double the quantity in the effect produced. The combination so formed is known as Rochon’s prism. Such a prism he placed between the object-glass and eye-piece of a telescope. The separation of the images increases as the prism is approached to the object-glass, and diminishes as it is approached towards the eye-piece.
D. F. J. Arago (Comptes rendus, xxiv., 1847, pp. 400-402) found that in Rochon’s micrometer, when the prism was approached close to the eye-piece for the measurement of very small angles, the smallest imperfections in the crystal or its surfaces were inconveniently magnified. He therefore selected for any particular measurement such a Rochon prism as when fixed between the eye and the eye-piece (i.e. where a sunshade is usually placed) would, combined with the normal eye-piece employed, bring the images about to be measured nearly in contact. He then altered the magnifying power by sliding the field lens of the eye-piece (which was fitted with a slipping tube for the purpose) along the eye-tube, till the images were brought into contact. By a scale attached to the sliding tube the magnifying power of the eye-piece was deduced, and this combined with the angle of the prism employed gave the angle measured. If p″ is the refracting angle of the prism, and n the magnifying power of the eye-piece, then p″/n will be the distance observed. Arago made many measures of the diameters of the planets with such a micrometer.
 |
| Fig. 18.Fig. 19. |
Dollond (Phil. Trans., 1821, pp. 101–103) describes a double-image micrometer of his own invention, in which a sphere of rock-crystal is substituted for the eye-lens of an ordinary eye-piece. In this instrument (figs. 18, 19) a is the sphere, placed in half-holes on the axis bb, so that when its principal axis is parallel to the axis of the telescope it gives only one image of the object. In a direction perpendicular to that axis it must be so placed that when it is moved by rotation of the axis bb the separation of the images shall be parallel to that motion. The angle of rotation is measured on the graduated circle C. The angle between the objects measured is = r sin 2θ, where r is a constant to be determined for each magnifying power employed,[21] and θ the angle through which the sphere has been turned from zero (i.e. from coincidence of its principal axis with that of the telescope). The maximum separation is consequently at 45° from zero. The measures can be made on both sides of zero for eliminating index error. There are considerable difficulties of construction, but these have been successfully overcome by Dollond; and in the hands of Dawes (Mem. R.A.S. xxxv. p. 144 seq.) such instruments have done valuable service. They are liable to the objection that their employment is limited to the measurement of very small angles, viz. 13″ or 14″ when the magnifying power is 100, and varying inversely as the power. Yet the beautiful images which these micrometers give permit the measurement of very difficult objects as a check on measures with the parallel-wire micrometer.
On the theory of the heliometer and its use consult Bessel, Astronomische Untersuchungen, vol. i.; Hansen, Ausführliche Methode mit dem Fraunhoferschen Heliometer anzustellen (Gotha, 1827); Chauvenet, Spherical and Practical Astronomy, vol. ii. (Philadelphia and London, 1876); Seeliger, Theorie des Heliometers (Leipzig, 1877); Lindsay and Gill, Dunecht Publications, vol. ii. (Dunecht, for private circulation, 1877); Gill, Mem. R.A.S. vol. xlvi. pp. 1-172, and references mentioned in the text. (D. Gi.)
- ↑ The circles by Reichenbach, then almost exclusively used in Germany, were read by verniers only.
- ↑ The diameter of Venus was measured with one of these heliometers at the observatory of Breslau by Brandes in 1820 (Berlin Jahrbuch, 1824, p. 164).
- ↑ The distances of the optical centres of the segments from the eye-piece are in this method as 1; secant of the angle under measurement. In Bessel’s heliometer this would amount to a difference of 151000th of an inch when an angle of 1° is measured. For 2° the difference would amount to nearly 110th of an inch. Bessel confined his measures to distances considerably less than 1°.
- ↑ In criticizing Bessel’s choice of methods, and considering the loss of time involved in each, it must be remembered that Fraunhofer provided no means of reading the screws or even the heads from the eye-end. Bessel’s practice was to unclamp in declination, lower and read off the head, and then restore the telescope to its former declination reading, the clockwork meanwhile following the stars in right ascension. The setting of both lenses symmetrically would, under such circumstances, be very tedious.
- ↑ This most important improvement would permit any two stars under measurement each to be viewed in the optical axis of each segment. The optical centres of the segments would also remain at the same distance from the eye-piece at all angles of separation. Thus, in measuring the largest as well as the smallest angles, the images of both stars would be equally symmetrical and equally well in focus. Modern heliometers made with cylindrical slides measure angles over 2°, the images remaining as sharp and perfect as when the smallest angles are measured.
- ↑ Bessel found, in course of time, that the original corrections for the errors of his screw were no longer applicable. He considered that the changes were due to wear, which would be much lessened if the screws were protected from dust.
- ↑ The tube, being of wood, was probably liable to warp and twist in a very uncertain way.
- ↑ We have been unable to find any published drawing showing how the segments are fitted in their cells.
- ↑ We have been unable to ascertain the reasons which led Bessel to choose ivory planes for the end-bearings of his screws. He actually introduced them in the Königsberg heliometer in 1840, and they were renewed in 1848 and 1850.
- ↑ A screen of wire gauze, placed in front of the segment through which the fainter star is viewed, was employed by Bessel to equalize the brilliancy of the images under observation. An arrangement, afterwards described, has been fitted in modern heliometers for placing the screen in front of either segment by a handle at the eye-end.
- ↑ This heliometer resembles Bessel’s, except that its foot is a solid block of granite instead of the ill-conceived wooden structure that supported his instrument. The object-glass is of 7.4 in. aperture and 123 in. focus.
- ↑ Description de l’observatoire central de Pulkowa, p. 208.
- ↑ Steinheil applied such motion to a double-image micrometer made for Struve. This instrument suggested to Struve the above-mentioned idea of employing a similar motion for the heliometer.
- ↑ Manuel Johnson, M.A., Radcliffe observer, Astronomical Observations made at the Radcliffe Observatory, Oxford, in the Year 1850, Introduction, p. iii.
- ↑ The illumination of these scales is interesting as being the first application of electricity to the illumination of astronomical instruments. Thin platinum wire was rendered incandescent by a voltaic current; a small incandescent electric lamp would now be found more satisfactory.
- ↑ For a detailed description of this instrument see Dunecht Publications, vol. ii.
- ↑ Mem. Royal Astronomical Society, xlvi., 1-172.
- ↑ The primary object was to have the object-glass mounted in steel cells, which more nearly correspond in expansion with glass. It became then desirable to make the head of steel for sake of uniformity of material, and the advantages of steel in lightness and rigidity for the tube then became evident.
- ↑ For description of the earliest form see Cambridge Phil. Trans. vol. ii., and Greenwich Observations (1840).
- ↑ Dawes (Monthly Notices, January 1858, and Mem. R.A.S. vol. xxxv. p. 150) suggested and used a valuable improvement for producing round images, instead of the elongated images which are otherwise inevitable when the rays pass through a divided lens of which the optical centres are not in coincidence, viz. “the introduction of a diaphragm having two circular apertures touching each other in a point coinciding with the line of collimation of the telescope, and the diameter of each aperture exactly equal to the semidiameter of the cone of rays at the distance of the diaphragm from the local point of the object-glass.” Practically the difficulty of making these diaphragms for the different powers of the exact required equality is insuperable; but, if the observer is content to lose a certain amount of light, we see no reason why they may not readily be made slightly less. Dawes found the best method for the purpose in question was to limit the aperture of the object-glass by a diaphragm having a double circular aperture, placing the line joining the centres of the circles approximately in the position angle under measurement. Dawes successfully employed the double circular aperture also with Amici’s micrometer. The present writer has successfully used a similar plan in measuring position angles of a Centauri with the heliometer, viz. by placing circular diaphragms on the two segments of the object-glass.
- ↑ Dollond provides for changing the power by sliding the lens d nearer to or farther from a.